Long Exposure HDR at New York Grand Central Station
Welcome to part 2 of my posts discussing and sharing photography trips in relation to our Ted on Tour USA road trip.
One technique I have been experimenting with is long exposure HDR. This technique is great for creating abstract effects and accentuating the illusion of movement. Read about how I approach long exposure HDR to create pictures with a wide dynamic range and enhancing a sense of movement in a scene.
Standard HDR photography doesnt usually feature movement. HDR is used primarily to capture a static scene that has a wide dynamic range between the highlights and shadows. Long exposure HDR, as the title implies, is the same concept of capturing a wide dynamic range, but uses long exposures. By the very nature of long exposures, you are going to record any movement of elements in your scene as either a blur or light streak.
Using Ghosting to Your Creative Advantage
Ghosting is caused by the tiny movement between each shot when hand holding a sequence of photos of the same subject. When you overlay these photos on top of each other, ghosting shows up as slight blurring around the edges of your static subject matter. If your camera is mounted on a tripod then ghosting is theoretically eliminated as the camera is steady between shots. Most HDR software allows you to control any ghosting when overlaying multiple pictures. HDR software will try to eliminate any ghosting when combining and processing the individual images into the final output image.
A series of long exposure pictures, particularly with people in the scene, will have plenty of blurred motion with the movement in each image drastically different to the previous. This movement can be used creatively by adjusting the ghosting settings.
I took 5 seperate pictures of New Yorks Grand Central railway station concourse taken with exposures of –
20secs
10secs
5 secs
2.5 secs
1 sec
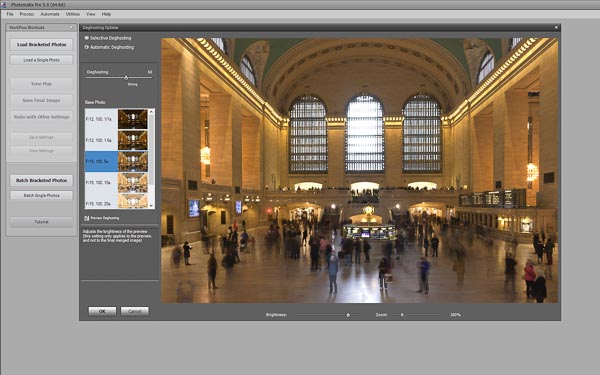
The images were merged in Photomatix Pro. Both Lightroom and Photoshop have Merge to HDR features but I personally prefer using Photomatix Pro. The ghosting setting was adjusted to give the scene a pleasant overall sensation of the peoples movement. If you try this technique, move the ghosting slider and watch the motion in your images transform itself as the setting changes.
Use of the deghosting setting has a major effect on how the movement is portrayed in the finished HDR picture.
The pictures below show the difference between a deghosting setting of 0 on the left and at 64 on the right.[/vc_column_text][ess_grid alias=”new-york-grand-central-station-hdr”][/vc_column][/vc_row][vc_row][vc_column][vc_column_text]
HDR Finishing Touches
I always tend to leave my HDR images for a day or two after the initial converting to a merged image. I do this because I like to come back with a fresh eye. There are so many variations of tone and contrast effects that I feel I become desensitised to the intense colours and contrasts inherent in HDR processing.
The small break allows me to come back with a fresh eye. I think its similar to eating rich food, after a while your taste buds become overwhelmed and the food doesnt taste as nice the more you eat. I definitely feel my visual acuity gets desensitised by the high saturation and contrast of newly merged HDR images.
Below is the completed long exposure HDR. The colour toning was applied seperately after conversion using Colour Efex Pro 4.[/vc_column_text][ess_grid alias=”new-york-grand-central-station-hdr-complete”][vc_column_text]Thanks for reading my take on long exposure HDR photography – I really hope you found it useful! There are links to more photography techniques below.
Let me know your thoughts in the comments section.
Ted on Tour USA – Choosing Camera Kit for an Epic Trip
Choosing Camera Kit for an Epic Trip is the first part of a new blog post series. This series will run parallel to our travel blog posts documenting our epic trip across America. This new series will feature the photographic related aspects of the 15000 mile trip.
In this first post I will discuss the process I used to choose what camera kit to pack for our 6 week Ted on Tour USA trip. I will also be providing background information and tips to some of the pictures taken on the first part of our trip from the UK to New York
Alternatively check out the timelapse video below![/vc_column_text][vc_video link=”https://youtu.be/LJzK-LAxT-U” align=”center” title=”Ted on Tour USA Video”][/vc_column][/vc_row][vc_row][vc_column][vc_column_text]
Which Camera Bag?
Our Norwegian Airlines flight allowed us to check in one 20kg bag each and take one carry on bag each. We chose to use a Lowepro camera bags as our carry on bags. This ensured all the delicate camera kit would be kept with us and away from the dreaded baggage carousel system.
I have several camera bags and chose the following for this trip –
Lowepro Mini Trekker AW which is capable of holding an SLR Camera with a large telephoto lens attached and 4 or 5 other lenses
Lowepro Fastpack 350 which holds an SLR Camera with a small zoom and 3 to 4 other lens.
Lowepro Event Messenger 250 shoulder bag. Ideal for a camera and a couple of lenses and a laptop.
I chose the Mini Trekker because it can carry a ton of camera kit and will (just) hold my camera with Nikon 200-500 attached. I use this camera bag 90% of the time.
The Fastpack camera bag is great as it has a top compartment ideal for carrying a wide array of items. You can use it to hold all your leads and chargers or alternatively put a bit of lunch and some other bits in there. The Fastpack camera bag has a slide-in opening for a laptop and/or notepad tablets.
The Event Messenger is a great shoulder bag that is ideal for when travelling light. It also has a slot for laptops (up to 15″ screens) and notepad tablets. The Event Messenger camera bag would travel empty and flattened in our checked in luggage. This camera bag would be ideal for travelling light when we got to ‘the other side’ and I didnt necessarily want to carry all the gear around.
Prior to the trip I did seriously look at buying a roller bag along the lines of a Think Tank Airport or similar. I eventually decided against buying one as I wasnt absolutely sure the roller bag would be better than a backpack when transferring between trains and planes etc.
I have undertaken many trips and found the backpacks perfectly when dragging suitcases around. I didnt want to risk my first experience with a roller camera bag on such a big trip.[/vc_column_text][ess_grid alias=”choosing-camera-kit-camera-bags”][/vc_column][/vc_row][vc_row][vc_column][vc_column_text]
Choosing Camera Kit
When I am choosing camera kit to take on any trip, I always start by listing where I want to go and what sort of shots I want to get. I have many lenses ranging from 15mm through to 500mm so needed to work out which lenses to leave at home without compromising my flexibility.
Abandoned buildings and vehicles, dereliction and abandonment
Mixed into this would be the obligatory general touristy type shots of wherever we went.
In order to select appropriate lenses I padded out the brief list above with some specific details[/vc_column_text][/vc_column][/vc_row][vc_row][vc_column width=”1/3″][vc_column_text]
[/vc_column_text][/vc_column][/vc_row][vc_row][vc_column][vc_column_text]Putting more details into our shot list made it easier to break down the lens characteristics I would need
Aircraft pics would need long reach
Street photography would need flexibility in zoom length
National Parks I thought would need wide and low light capable
Aircraft museums would need wide view and low light capable
I always want to take all my camera kit on every trip but it simply wasnt practical on this trip. With this in mind I sort through all my kit and remove things I can justify leaving at home. I couldn’t foresee having the time to mess with flash or macro so it was easy to discount all my flash kit and macro lenses.
Working through the considerations I felt these lenses made sense
Nikon 200-500 f5.6 for airbases and airports
Sigma 18-200 C, Nikon 16-85 and Sigma 18-35 f1.8 A for Street photography
Nikon 50mm f1.8 because its so light I take it everywhere!
This lens selection would provide a lot of flexibility and cover pretty much every scenario encountered.
Cameras
Choosing cameras is always a lot easier – I always take all 3 cameras!
Nikon D7200
Nikon D300
Sony NEX6 with 16-50 lens
I usually keep the Nikon 16-85 on my D300 for general shots. I then use my Nikon D7200 with whatever specialist lens capability I want.
The Sony NEX6 is great for general pictures plus video. Its so small and light yet the picture quality is fantastic.
Camera Accessories
I also threw (metaphorically) these filters and accessories into the bags –
Hoya Pro 1 circular polariser filter for 16-85 and 18-200 due to potential haze and glare on the Pacific Coast highway and in the desert
A selection of different rated neutral density filters for creative work
Manfrotto 055 tripod
Manfrotto Ball head 057 Magnesium Ball Head with Q5 Quick Release
Manfrotto 035 Universal Super Clamp
Memory cards – as many as I could get into my bags
Laptop
Spare batteries
Chargers for everything
Apart from the cameras, lenses, laptop and notebook tablets, everything else would go in the suitcases. The camera bags would be heavy enough, so all of the robust non essential stuff would go into the suitcase.[/vc_column_text][/vc_column][/vc_row][vc_row][vc_column][vc_column_text]I have to make special mention of the Manfrotto Universal Super Clamp. This single piece of kit is simply amazing! Combine it with the ball head and you have a really useful tool for when a tripod either isnt allowed or there isnt sufficient space. It can be a bit unwieldly, but the flexibility if you can find a mounting point, is fantastic.
The jaws open wide and it clamps to pipes, railings, poles – pretty much anything. With the ball head fitted you can move your camera around irrespective of the fixings orientation. You do need to ensure there is a reasonable amount of clearance around your fixing point to allow your head and camera to be moved. It’s fantastic though and has made many long exposure shots possible that I would otherwise have missed or at least struggled to get.[/vc_column_text][ess_grid alias=”manfrotto-super-clamp”][vc_column_text]
Camera Kit Complete
So after working through my shot list I had finally decided on what camera kit to take.
Nikon 200-500 f5.6 for airbases and airports
Sigma 18-200 C, Nikon 16-85 and Sigma 18-35 f1.8 A for Street photography
Nikon 50mm f1.8 because its so light I take it everywhere!
Nikon D7200
Nikon D300
Sony NEX6 with 16-50 lens
Hoya Pro 1 circular polariser filters
A selection of different rated neutral density filters
Manfrotto 055 tripod
Manfrotto Ball head 057 Magnesium Ball Head with Q5 Quick Release
I’m always on the lookout for unusual shots and angles from the moment I leave the door. I knew the low level Thameslink platforms would provide a nice low light opportunity. I like long exposures and low light photography so was interested in the potential for blurred motion pictures of the trains arriving and departing. The long exposures are also great for getting people to show up as shadowy characters as they walk along the platforms.
I used the suitcases as a stable rest and the cameras built in timer in place of a tripod and release cable to get some pictures of the trains arriving and departing. Just because my tripod was packed in the suitcases didnt mean I wasnt going to take some long exposure photos. I moved the cases around to suitable places on the platform and took a number of long exposures. If you dont have anything with you put your camera on the floor, or on seats, bins – anything that is stable will do! Be creative and use the things to hand! Just be sensible – dont use improvised items right at the edge of platforms or block entrances and exits, you know the score!
I had hoped to get some aircraft photos whilst at Gatwick but the views were useless. I didn’t bother getting any photos in the departures lounge and surrounding area as basically there wasn’t a lot of scenes that caught my interest. I just didnt feel the ‘vibe’ and didnt feel the effort worth risking the attention from the heavy security presence for the meagre pickings on offer.
Shooting From on High
In part 2 – Gatwick to New York I mentioned we used the open top Big Bus tours to get around New York. These open top buses were great for orientating ourselves in a new city. From a photographers point of view they are great for several reasons –
The tour guides provide a great insight and point things out you would likely miss if unescorted
you see things you may not see from the ground
the elevated position gives you a different view of your chosen subject
people are unaware of your presence so there are great candid picture opportunities
Unfortunately there are a few downsides to the Big Bus tour buses for photographers –
an obvious lack of opportunity to ‘work’ a scene from different viewpoints
your fixed viewpoint means you almost always need a superzoom
other passengers on the bus getting in the way!
One additional bonus I didn’t anticipate with Big Bus tour was on the rainy days. I got some great abstract pictures of rainstreaked windows combined with the array of city lights. We also got to see the city and keep dry!
The Manfrotto Super Clamp would also come into its own for the views from high rise buildings. Tripods are a definite no no in most high rise buildings and, in reality, the volume of people around you makes them almost impossible to use. Most of the places we visited had some sort of railing or fixing I could use to stabilise the camera. As said before, the Super Clamp is a great piece of kit. In a couple of places I noticed the security guys watching me use the clamp. I could almost hear them wanting to scream ‘Excuse me Sir, you cant do that’ but obviously couldnt find an excuse to say it!
Below are examples from the scenarios discussed above.[/vc_column_text][ess_grid alias=”choosing-camera-kit-grid”][/vc_column][/vc_row][vc_row][vc_column][vc_column_text]
Part 2 – Long Exposure HDR
One technique I have been trying out is long exposure HDR. I wanted to try this technique out at New York Grand Central Station. This is an iconic location that has plenty of character and is perfect for standard HDR but has the added element of being very busy.
In part 2 I will show the results and discuss the techniques used.
Thanks for reading about how I chose which camera kit to take – I really hope you found it useful! Let us know your thoughts below
All the best for now and hope to see you in part 2!
Wow, what a year 2016 was! Personally and professionally, 2016 was a year to remember.
Personally, several ‘bucket list’ items were ticked off as we traveled across the US and The Caribbean during the spring.
Professionally we made great strides in solidifying the GDMK Images brand as a quality source of creative and unique artwork and photography. 2016 was our first full year taking our art stall around the country and was a great success. Its really satisfying so many people show their appreciation for our work.
It’s easy to bulk buy mass produced products at a low price point and resell them. We are not about selling for the sake of selling. We are about creating something different – something a little special that can’t be bought elsewhere.
I am passionate about the subjects in my work and I hope that comes through in my unique art style.
We made some great friends and met some really cool people along the way. Its not all about selling you know!
Below is a quick video summary of GDMK Images in 2016. The first video shows a taster of what you will see in our #tedontourusa trip blog posts. Part 1 of the Ted on Tour USA blog series is already available.
The second video is the soundtrack of our summer events, a soundtrack dominated by English Electric, Merlins, Napier, a bit of sizzling steam and a few other oddities thrown in![/vc_column_text][vc_row_inner][vc_column_inner width=”1/2″][vc_column_text]
We are proud of our achievements of 2016 and are really looking forward to 2017. Our event list is being finalised and will be posted shortly. You will be able to come and say hi at many railway, aviation, classic vehicle and military shows in 2017. Remember to subscribe to the GDMK Images newsletter to keep up with our latest news and events or alternatively keep an eye on the Where to Find GDMK Images Page
What Can You Expect From GDMK Images in 2017?
We have lots planned for 2017 including –
blog posts about our 2016 Tedontourusa trip including travel and photography tips
a new railway digital art series called ‘End of the Line’
a new range of gifts available exclusively from our art stall
new military digital art starting with ‘The Home Guard’ and ‘An Officer and a Lady’
digital art featuring RAF Lancasters ‘Over Enemy Country’ and Dakotas ‘One Day in June’
Thanks for your support over the last 12 months, heres looking forward to 2017!
If you liked this article then why not share it with someone you know who will also find it interesting …. thanks! [juiz_sps buttons=”facebook, twitter, google, pinterest, digg, linkedin, stumbleupon, mail”]
Our stall was located inside the diesel shed at Toddington which created a great atmosphere for the event surrounded by locos under restoration and all the associated engineering equipment.
In the shed was D1693 (47105) undergoing a thorough restoration by its owners the Brush Type 4 Fund. The class 47 loco was used extensively on all sorts of freight and express passenger duties all over the UK network and a small number are still in use today. Over 500 of these locos were built and several are preserved or under restoration on preserved railways around the UK.
The groups other Class 47 loco, 47367, was in use during the diesel gala and is painted in Railfreight grey Freightliner colours as carried in the 90s.
Next to this was a very rare class 20 loco. This loco, currently numbered 2001, was part of the CFD fleet which worked in connection with the construction of a high speed rail link in France. In British Rail service the loco was numbered 20035. 20035 went to France in around 1992 but was never very reliable in service for its French operator. It spent a long time out of service following mechanical breakdowns and eventually returned to the UK in 2005. It is in a very poor condition and is being used as a source of spares for the other class 20 loco on the railway D8137 (20137) and the owners other class 20 (20228) based at Barry. Once component recovery is completed the shell will most likely be scrapped.[/vc_column_text][vc_single_image image=”18050″ img_size=”large” alignment=”center” onclick=”link_image”][/vc_column][/vc_row][vc_row][vc_column][vc_column_text]
Growler Groups Stunning Restoration of 37248
One of the highlights of the diesel gala was the use of English electric Class 37 D6948 (37248) which is looking absolutely immaculate following a thorough rebuild and looks as good as the day it entered service in 1964.
This loco is owned by the Growler Group which is based on the railway with its stablemate 37215.
37215 has been restored into BR Blue colours as it would have looked in the 1970s and 1980s whilst D6948 carries its original BR Green colours in which it was delivered to British Rail.
The Growler Group had their publicity stand in the diesel shed with us and several other stall holders. Ted took the opportunity to join the Growler Group as he was very impressed with their locos.
Below are two short videos of their Class 37s. The first shows the stunning quality of 37248s restoration into as built condition. The second shows 37215 departing Toddington with a train.[/vc_column_text][vc_row_inner][vc_column_inner width=”1/2″][vc_video link=”https://youtu.be/bZJLjPfAPjQ” title=”Class 37 37248″][/vc_column_inner][vc_column_inner width=”1/2″][vc_video link=”https://youtu.be/973N4pFxRtA” align=”center” src=”“https://www.youtube.com/embed/973N4pFxRtA“” width=”“560“” height=”“315“” frameborder=”“0“” title=”Class 37 37215″][/vc_column_inner][/vc_row_inner][/vc_column][/vc_row][vc_row][vc_column][vc_column_text]
Ted Gets to Grips With a Class 47
Following Teds recent flights in the C-47 Skytrain and B-17 Flying Fortress Sally B, Ted jumped at the chance to get to grips with a main line diesel loco. Class 47 D1693 (47105) was open to inspect so Ted dived at the chance to sit in the driver’s seat of this 95 mph main line mixed traffic loco.[/vc_column_text][/vc_column][/vc_row][vc_row][vc_column][ess_grid alias=”ted-drives-a-class-47″][/vc_column][/vc_row][vc_row][vc_column][vc_column_text]
Gloucestershire Warwickshire Steam Railway History
The Gloucestershire Warwickshire Railway runs through the stunningly beautiful Cotswold countryside. The heritage railway was originally part of the Great Western Railway’s main line from Birmingham to Cheltenham, via Stratford-upon-Avon. Work started in 1900 and was completed by 1906.
The line was closed to Passenger traffic in March 1960. The Gloucestershire Warwickshire Steam Railway was formed in 1981 with the intention to re-open the line from Stratford Race Course to Cheltenham Racecourse. The line was originally double tracked throughout but now consists of a single line with passing loops at stations.
The railways operating base was established at Toddington. The railway restored 1/4 of a mile in 1984 and the first trains operated in the same year. There is now just over 12 miles of track from Laverton to Cheltenham Race Course with an almost complete northern extension to Broadway.
The railway predominantly runs steam hauled trains with regular turns for its diesel loco fleet.[/vc_column_text][/vc_column][/vc_row][vc_row][vc_column][vc_column_text]
Preserved Locomotives Based on the GWSR
The GWSR has a wide range of locomotives and their associated owning and support groups based on the railway. Below is a listing of steam and diesel locos based at the time of the 2016 diesel gala. I have included links to their owning groups. Please take time to have a look at the groups pages as you will find much of interest about the respective groups locomotives. Each of these groups are to be applauded for the excellent restorations of their locos which are a tribute to their hard work.
[/vc_column_text][/vc_column][/vc_row][vc_row][vc_column][vc_column_text]The gala featured most of the home diesel loco fleet plus class 33 D6575 (33057) visiting from the West Somerset Railway.
Crowds seemed healthy enough, with trains seemingly well loaded with happy punters, so hopefully the railway will make sufficient profit to ensure many more of these great events can be run.
Railway Galas quite often provide us with quiet periods after each train has departed. Apart from allowing us to take a breath from selling and answering questions about my art style, I like to hunt out abstract picture opportunities.
There are photo opportunities everywhere and many times I like to look for abstract scenes that would look good in black and white or subjected to various colour treatments.
Railways are full of picture opportunities. Of course everyone wants to get the standard shots of the ‘big’ attractions, but for the following week, social media is awash with similar pictures of locos all looking sort of well …. similar. ‘Record shots’ are everywhere, don’t fall into becoming a ‘record shot’ photographer.
Push yourself to break the mould and look for different opportunities. Low angle, ground level, high vantage points, close-up and abstract picture opportunities are all around you. Challenge the inner photographer in you and find something different. Many pictures might well turn out pants, but some will be a little bit special. Many more efforts will let you know you are on to something different and next time you will know to get a little higher, a little lower, a bit closer or indeed further away.
Do something different. Your eye will develop and you will create your own style. Become a railway photographer rather than someone who takes pictures of trains.
I hope you have enjoyed the photos and my overview of the diesel gala, please feel free to leave any comments below
All the best for now
Gary[/vc_column_text][/vc_column][/vc_row][vc_row][vc_column][vc_separator color=”sky” el_width=”80″][/vc_column][/vc_row][vc_row][vc_column][vc_cta h2=”Subscribe to GDMK Images” txt_align=”center” add_button=”bottom” btn_title=”Sign me up!” btn_custom_background=”#0098da” btn_custom_text=”#fffffd” btn_link=”url:http%3A%2F%2Fstaging.gdmkimages.co.uk%2Fsubscribe-gdmk-images-newsletters%2F|title:Subscribe%20never%20miss%20an%20update!||”]Subscribe and never miss an update![/vc_cta][/vc_column][/vc_row][vc_row][vc_column][vc_column_text]
If you liked this article on the Gloucestershire Warwickshire Railway Diesel Gala then why not share it with your family and railway enthusiast friends .… thanks!
Hinckley finally has its brand new shopping centre. The concept of a rejuvenated bus station and shopping area, has been on the cards for Hinckley for a long, long time. Talk of a bus station redevelopment with a supermarket at its heart has been around since at least the mid 1990s.
I wanted to record the existing buildings, their demolition and the new building works. My decision to do this was partly as an attempt to ‘document’ a large scale project on my doorstep and also as a record for future generations.
At the end of the article are links to my Alamy lightbox of licensable pictures from this article. Following this is a review of the project from a photographers point of view. Here I discuss what I learnt and provide tips on how to go about planning your own similar project.
So here we go – a picture essay of the building of The Crescent shopping centre in Hinckley.
The development involves a piece of land bordered by Brunel Road, Rugby Road, Lancaster Road and Station Road.
Rugby Road Shops and Businesses
Below are the shops and businesses that existed along Rugby Road taken shortly after being fenced off.
Starting off we have the row of small units along Waterloo Road. The shop on the corner was Punctillios Model spot. I bought many an Airfix, Tamiya and other model kits in my distant youth. There was also a launderette, the old Wainfleet Bus booking office (long since closed) and a few others. I do remember there being one of the first computer shops in Hinckley here. Again many a mis-spent hour poring over the latest Spectrum game releases! Moving onto Rugby Road was the Catalogue Shop, which was the final incarnation of this building that had seen occupants as diverse as various bars and nightclubs through to a childs soft play centre.
The Sawasdee Thai restaurant was next to this followed by Bennetts Hosiery factory. The final affected building was ‘Hinckley Dry Cleaners’ that did nothing to hide its previous existence as a garage.[/vc_column_text][/vc_column][/vc_row][vc_row][vc_column][vc_masonry_media_grid style=”lazy” item=”9524″ grid_id=”vc_gid:1510601948069-03ee52ea-b503-10″ include=”9449,9456,9506,9450,9457,9455,9451,9453,9454,9452″][/vc_column][/vc_row][vc_row][vc_column][vc_column_text]
Station Road Businesses
On the Corner of Lancaster Road and Station Road was Appleton House which was home to various accounting businesses. Moving along station road were a number of units that had mixed occupants. Unbelievably, I somehow managed to miss out the Volvo dealership on the corner of Station Road and Brunel Road. Not sure how that happened but there you go.[/vc_column_text][/vc_column][/vc_row][vc_row][vc_column][vc_masonry_media_grid style=”lazy” item=”9524″ grid_id=”vc_gid:1510601948080-4b33c990-978c-7″ include=”9448,9447,9446,9445″][/vc_column][/vc_row][vc_row][vc_column][vc_column_text]
Brunel Road Businesses
The only businesses in Brunel Road were the Sainsburys and Iceland. These were located in the short stay carpark on the Right hand side of the road when looking down the hill.
The Volvo dealership ran down from the corner of Station Road and behind this was a gym and another couple of units. In front of these units was another short stay carpark and the bus station itself.
On the Left hand side of the road looking down the hill, was an old car repair centre, the St Johns Ambulance Building and a long stay car park. The garage sign is shown below where you can see the cleared concrete pad of the St Johns building directly behind with the long stay car park in the far distance.[/vc_column_text][/vc_column][/vc_row][vc_row][vc_column][vc_masonry_media_grid style=”lazy” item=”9524″ grid_id=”vc_gid:1510601948086-3b3b71a4-154e-7″ include=”9444,9443,9442,9441,9440″][/vc_column][/vc_row][vc_row][vc_column][vc_column_text]
Clearance Work and Demolition
Here are several different views of the demolition and clearance works.[/vc_column_text][/vc_column][/vc_row][vc_row][vc_column][vc_masonry_media_grid style=”lazy” item=”9524″ grid_id=”vc_gid:1510601948091-ef9f3754-9fbd-5″ include=”9507,9501,9502,9462,9439,9503,9505,9461,9504,9512″][/vc_column][/vc_row][vc_row][vc_column][vc_column_text]
Views From Hinckley Bus Station
Looking towards Rugby Road from the road through the Bus Station.[/vc_column_text][/vc_column][/vc_row][vc_row][vc_column][vc_masonry_media_grid style=”lazy” item=”9524″ grid_id=”vc_gid:1510601948099-a6b8b60e-6966-3″ include=”9458,9459,9460″][/vc_column][/vc_row][vc_row][vc_column][vc_column_text]
The Crescents First Shoots Start to Show
Building work starts in earnest as the land is cleared of demolition debris. The first signs of the ironwork and superstructure are appearing.[/vc_column_text][/vc_column][/vc_row][vc_row][vc_column][vc_masonry_media_grid style=”lazy” item=”9524″ grid_id=”vc_gid:1510601948103-8060f618-248d-8″ include=”9469,9463,9464,9466,9467″][/vc_column][/vc_row][vc_row][vc_column][vc_column_text]
Construction Machinery and Vehicles
There was plenty of impressive hardware to see during the construction. I like my man-toys and gadgets and always find the machinery on show interesting.
Along with the usual diggers and dumpers, there were some impressive piling machines, drills and cranes. Always impressive to see when at work.[/vc_column_text][/vc_column][/vc_row][vc_row][vc_column][vc_masonry_media_grid style=”lazy” item=”9524″ grid_id=”vc_gid:1510601948107-cbfbfd73-aaaa-0″ include=”9475,9472,9468,9470,9431,9433″][/vc_column][/vc_row][vc_row][vc_column][vc_column_text]
New Buildings Familiar Sights
I always like to try and include something familiar in these type of transition shots. Including something old against the new build helps people to relate to familiar landmarks. Sometimes if the familiar is omitted it is hard to orientate where the photo is taken from and how it relates to the exisiting and known landscape. These photos help to prove Hinckley is still there in the background![/vc_column_text][/vc_column][/vc_row][vc_row][vc_column][vc_masonry_media_grid style=”lazy” item=”9524″ grid_id=”vc_gid:1510601948112-98aa56ca-fa3e-2″ include=”9471,9474,9432,9469,9483″][/vc_column][/vc_row][vc_row][vc_column][vc_column_text]
Construction Well Under Way
It doesn’t seem to take long for the superstructure and internal framework to take shape. Here are various views of the superstructure and ironwork.[/vc_column_text][/vc_column][/vc_row][vc_row][vc_column][vc_masonry_media_grid style=”lazy” item=”9524″ grid_id=”vc_gid:1510601948118-8b31e8fa-cd57-0″ include=”9482,9481,9479,9434,9478,9477,9435,9480,9465,9244″][/vc_column][/vc_row][vc_row][vc_column][vc_column_text]
The Crescent Is Almost Ready
And so we have it – almost. All the major construction is completed. Sainsburys and Cineworld are open with the other units being fitted out for their new occupants.[/vc_column_text][/vc_column][/vc_row][vc_row][vc_column][vc_masonry_media_grid style=”lazy” item=”9524″ grid_id=”vc_gid:1510601948125-823cc895-1db8-10″ include=”9484,9485,9486,9438,9437,9436,9487″][/vc_column][/vc_row][vc_row el_id=”editorial-pictures”][vc_column][vc_column_text]
I think this kind of long term project is valuable for photographers for many reasons.
Documenting change over time requires a certain amount of self discipline to revisit the same place over and over again. Your first couple of visits to the scene will be pretty easy as you are ‘setting the scene’ so to speak. These initial visits are basically documenting the scene as it exists prior to any change.
Over time though, especially during multi-year projects where nothing seems to change from month to month, it can become harder to get scenes that have an element of interest (both for you and any potential future viewers). This is particularly true if you pass the site regularly. Seeing the site repeatedly makes it harder to judge the incremental change.
This project started off as a casual project with the main aim to simply record the changes. The timing was not perfect (is it ever?) as I was dealing with some pretty intense personal circumstances. The project was a form of therapy to allow me to simply chill out whilst doing something constructive.
Looking back, I realise how valuable such a project can be to develop a photographers skills, particularly those skills that are not needed to use a camera.
If you decide to try a similar project here are a few pointers I think you will find of use.
I recommend setting up a timetable that splits the project into a timeline. Try to find out as much as possible about the project. Establish the planned start and finish dates as a bare minimum. Also, try to get some inside ‘gen’ on any other key dates. Events such as when large or unusual machines are expected on site, local dignitaries are booked to visit etc will provide many photographic opportunities. Try and find out project phase dates (demolition phase, land clearance phase, construction phase etc).
Armed with this info you can build a rough schedule and slot in appropriate potential dates to visit. Review the schedule and build yourself a shooting plan. Your shooting plan should include both regular visits, to capture the phased changes, and ad-hoc dates that include the projects key dates. Creating a shooting plan is one thing – sticking to it is another. This is where self discipline is vital. How frequent your regular visits are is entirely up to you. For a year long project you might decide fortnightly or monthly visits are appropriate. Remember, the more frequent the visits the harder it is to stick to the plan. Conversely, the less frequent the visits, the more likely you are to miss something of interest. Less frequent visits make it more likely you might forget or lose interest.
Before each visit, review your pictures from previous visits. By doing this you will refresh your mind on areas of interest. You will also see the step change since your last visit – even if very little may seem to have changed to the untrained eye.
Even if little does change, you will find over time that different viewpoints become available. This allows you to capture the work from a different angle which in itself can reveal further scenes of interest.
This is particularly useful when you are trying to include existing landmarks into the changing scene. Existing landmarks are useful because it allows people to orientate themselves within the scene.
All these pictures were taken from outside the perimeter of the building site. Going forward I would like to get the necessary permissions to enter a site. This will allow some real insight into what is involved and allow access to the real essence of the project.
Reviewing this project, I realise I learnt so much that will be invaluable for future projects. More importantly I realise how much I missed.
I hope you have enjoyed this snapshot of history and my thoughts about planning a similar project. I enjoyed tracking the development of this building project. Its surprising how quickly once familiar scenes can completely change.
Please let me know what you think of these tips. It would be great to hear about any similar projects you have undertaken and what you learned.
Feel free to ask me any questions about this article.
Thanks for reading and all the best for now
Gary[/vc_column_text][/vc_column][/vc_row][vc_row][vc_column][vc_separator color=”sky” el_width=”80″][/vc_column][/vc_row][vc_row][vc_column][vc_cta h2=”Subscribe to GDMK Images” txt_align=”center” add_button=”bottom” btn_title=”Sign me up I want to save 10% on my purchase!” btn_custom_background=”#0098da” btn_custom_text=”#fffffd” btn_link=”url:http%3A%2F%2Fstaging.gdmkimages.co.uk%2Fsubscribe-gdmk-images-newsletters%2F|title:Subscribe%20and%20save%2010%25%20off%20your%20next%20wall%20art%2C%20phone%20case%20or%20t-shirt%20purchase!|”]Subscribe and save 10% off your next wall art, phone case or t-shirt purchase![/vc_cta][/vc_column][/vc_row][vc_row][vc_column][vc_column_text]
Share this story about Hinckleys new shopping centre with your friends and colleagues …. thanks!
The Severn Valley Railway is a preserved railway that runs 16 miles between Kidderminster and Bridgnorth. As with most of todays heritage railways, the line fell victim to the rationalisations that ravaged the railways in the 1960s. Even before the infamous Beeching Report, the Severn Valley Railway was recognised as economically unviable and identified as a candidate for closure.
The railway ran from Hartlebury through to Shrewsbury. Construction started in 1858 with final completion coming in 1862. Stations were located at Stourport-on-Severn, Bewdley, Arley, Highley, Hampton Loade, Bridgnorth, Coalport, Ironbridge, Buildwas, Cressage and Berrington.
Primary traffic for the line was coal from the collieries at Alveley and Highley. The line was never considered as financially successful.
The railway became part of the Great Western Railway in 1870.
The Great Western Railway built a link from Bewdley to Kidderminster in 1878. This connection allowed traffic access to the Black Country and West Midlands.
The line played a useful role during the Second World War as a diversion route around the Midlands.
Through passenger and freight services ended during 1963. The line was removed north of Bridgnorth soon afterwards.
Coal traffic continued from Alveley until 1969. Passenger services from Bewdley to Kidderminster and Hartlebury lasted until 1970.
Preservation Beginnings
In 1965 a group of local enthusiasts formed the Severn Valley Railway Society.
Their aim was to buy the section of line from Bridgnorth through to Alveley Colliery sidings near Highley.
The societies hard work was rewarded in 1970 when the first train services ran between Bridgnorth and Hampton Loade.
By 1973 sufficient funds allowed purchase of the the line from Alveley Colliery sidings, through to Highley, Arley and Bewdley as far as Foley Park, near Kidderminster.
Services started running south to Bewdley in 1974 with occasional special trains running through to Foley Park.
The railway always knew a station and connection with the national railway network at Kidderminster was vital.
British Rail traffic to the British Sugar Corporation sidings at Foley Park ceased in 1982. This presented an opportunity to buy the 1 ½ miles of railway through to Kidderminster Junction. At the same time, an agreement to lease the old Kidderminster Goods Yard from British Rail allowed the dream of a station at Kidderminster to become reality.
The new Severn Valley Railway station at Kidderminster came into use in 1984. Finally trains were able to run over the full length of the Severn Valley Railway as we know it today.[/vc_column_text][/vc_column][/vc_row][vc_row][vc_column][vc_column_text]
Overview of the Severn Valley Railway Today
Today, the Severn Valley Railway is a far cry from the economically unviable railway of the early 20th Century.
The railway is predominantly operated by steam locos with a small number of services, mainly at weekends, operated by classic diesel locos. The Severn Valley Railway is the home of many types of steam and diesel locos.
Many railway preservation societies call the Severn Valley Railway their home including –
Each of these societies are focused on preserving and operating many different types of loco, coaching stock and infrastructure but each contributes to the Severn Valley Railways success. When you have read this article, please take a few minutes to read about their organisations as they deserve much support.
All stations are maintained in typical Great Western Railway styles and colours and the railway retains its authentic Great Western Railway lower quadrant signals.
Moving away from the locos, the Severn Valley Railway operates classic period rolling stock. Of particular note is the railways achievement in running full rakes of coaches from defined periods. Many railways find themselves in a position where their coaches are a mix and match of styles and eras.
The Severn Valley Railway can proudly boast its ability to run full rakes of rolling stock from the following railway companies
Great Western Railway
London Midland and Scottish Railway
London and North Eastern Railway
1950s/1960s British Rail
The LNER rake is particularly eyecatching with its varnished teak panelled exterior.
As well as running regular steam and diesel timetabled services, the Severn Valley Railway has regular theme days to attract visitors including
Steam galas featuring many visiting steam locos
Diesel galas where the service is operated by classic diesel locos
Most visitors start their journey at Kidderminster, which is ironically the railways newest station and modelled on the original Great Western Railway station at Ross on Wye.
Kidderminster mainline station is directly adjacent to its mainline counterpart, being only a short walk across the cobbled station frontage. This provides a convenient connection for visitors using the main railway network.
At Kidderminster station you will also find the Kidderminster Railway Museum (www.krm.org.uk) and the Coalyard Miniature Railway.
Bewdley has three platforms and was originally the junction station for trains to Hartlebury or Kidderminster. Adjacent to the station is a goods yard full of wagons and coaching stock.
Highley is a small station but also home to The Engine House. There is only one platform but several lines through the station. This a reminder of the areas important mining past and that industries reliance on the railway to get its produce to the market.
The Engine House at Highley is an interesting visitor and education centre. On display are several steam locos for you to get up close to and get a real sense of the immense size and presence of a full-size steam loco.
Another item of interest is an original Post Office sorting vehicle. Inside you can see how mail was sorted on the go by mailmen in days gone by.
On the upper floor is an excellent cafe and viewing terrace which allows great views of passing trains.
[/vc_column_text][vc_media_grid item=”2915″ grid_id=”vc_gid:1480361748635-de2b9bec-7682-0″ include=”2908″][vc_video link=”https://youtu.be/5TV5MDwb5V8″ title=”View From The Engine House Cafe Balcony”][/vc_column][/vc_row][vc_row][vc_column][vc_column_text]
Hampton Loade Station
Hampton Loade is a beautiful station that seems to be in the middle of nowhere. Trains pass here allowing you the chance to change trains.
The Severn Valley Railways northern terminus station. The buildings date back to the railways original opening in 1862, albeit with numerous changes in that time.
Bridgnorth has a locomotive works and yard. You can get an overview of the works from the platform and station overbridge but access is not allowed.
I suppose this is due to that dreaded ‘Health & Safety’ mantra that dominates the modern world – whatever happened to using common sense and taking responsibility for your own health and safety? Please, don’t get me started![/vc_column_text][/vc_column][/vc_row][vc_row][vc_column][vc_column_text]
Photographic Opportunities
On The Railway Photographic Opportunities
There are many factors besides the meticulously restored stations, locomotives and coaching stock that makes the Severn Valley Railway so rich in photographic opportunities.
Each station provides fantastic opportunities for capturing or recreating period scenes. You can document the operational activities of a busy railway scene. Guards and Station Masters interact with the public, drivers attend to their locos and massive locos ooze atmosphere alongside authentic signalling equipment. There is much to inspire photographers.
The attention to detail means many period still life set pieces are everywhere including authentic signage and period baggage.
Interesting pictures can be had at the north end of Arley Station. Trains pass here and you can get some nice images of the trains passing. At the north end of the Platform is a grassy picnic area with a restricted view to the north. You can get shots of the southbound service arriving with the loco of the northbound service in the foreground. Afternoons are better due to the suns position.
At Highley, cross the bridge and walk northwards past the signalbox. Pick a point along the fence to get pictures of southbound services coming round the bend. The trains approach head on before entering the station. Telephoto lenses create a compressed field of vision for this shot. Afternoons are better when the sun has moved around.
The overbridge at Bridgnorth station provides a useful viewpoint of the yard as well as views of trains ready to depart southwards. The view southbound can be tricky with high contrast lighting being a problem most of the day.
The first location is still technically on the railway. The Engine House viewing balcony is an excellent place to relax with a cuppa and view the trains coming and going from Highley Station. I recommend this location in the afternoon as the sun will have moved around sufficiently to light your subjects.
The railway meanders, as its name suggests, through the Severn Valley and at many points is close to the Severn River. At 16 miles in length, the railway passes over several level crossings, public footpaths and bridges, all of which provide lineside photo opportunities.
The Severn Way, a long distance footpath following the River Severn, provides several vantage points for photographing the railway between Arley and Highley stations.
The most well known of these spots features the Victoria Bridge passing over the River Severn just south of Arley Station. This location is a classic photography spot on the railway and features regularly in the railway press. As with the Engine House location at Highley, lighting is more favourable in the afternoon.
You can leave the train at Arley and walk down to the river. Follow the Severn Way northwards towards Highley. Along the Severn way you will encounter several locations that set the railway in context with the surrounding countryside. This walk should be undertaken in the morning to take advantage of the morning light. In the afternoon your scene will become backlit as the sun moves around.
If you were feeling adventurous, it is possible to walk from Bewdley through to Hampton Loade. You would follow Northwood Lane until you came to the Severn Way. The route generally follows the railway and provides many different opportunities to photograph passing trains.
I must stress in the strongest terms, DO NOT TRESPASS on the railway at any time, however exceptional you think your photo could be. Trespassing is illegal. Walking around a working railway is dangerous – trains WILL kill you. Your presence is a distraction for the staff who have a job to do. Ultimately, stupid acts of trespassing usually result in unnecessary tighter controls on those of us who do respect the railway environment.[/vc_column_text][/vc_column][/vc_row][vc_row][vc_column][vc_column_text]
Lasting Impression
My lasting impression of the Severn Valley railway is overwhelmingly positive. For a start the line is a good length and trains are regularly 7 or 8 carriages long meaning the locos have to work hard in places.
Each of the stations are impeccably restored and maintained to represent a working Great Western Railway allowing yourself to be immersed in the ambience of times long since passed.
Add in the fact that the railway passes through some stunning scenery and you have a winning formula.
The railway and the hosted preservation societies provide a nice mix of large and small locos mixed in with matching rakes of coaching stock.
The railway also has regular turns for the diesel fleet which I highly commend. A lot of people think of diesels as boring, but they nevertheless played an essential role in the history of Britains railways.
Preserved railways need to remember that many people won’t remember steam trains active on the ‘real railway’. I’m in my late 40s and never saw a steam train in service. My youth is full of BR Blue diesels with compartment stock working trains to various seaside resorts.
I hope you enjoyed this overview of the Severn Valley Railway. Please take a little time to visit the groups I have linked to as restoring and running railways is an expensive, unglamorous and time consuming labour of love. The groups deserve all the support and publicity they can get.
I would love to hear your views on what I have written and am only too happy to answer any questions you might have.
[/vc_column_text][/vc_column_inner][/vc_row_inner][/vc_column][/vc_row][vc_row][vc_column][vc_separator color=”sky” el_width=”80″][/vc_column][/vc_row][vc_row][vc_column][vc_cta h2=”Subscribe to GDMK Images” txt_align=”center” add_button=”bottom” btn_title=”Sign me up I want to save 10% on my purchase!” btn_custom_background=”#0098da” btn_custom_text=”#fffffd” btn_link=”url:http%3A%2F%2Fstaging.gdmkimages.co.uk%2Fsubscribe-gdmk-images-newsletters%2F|title:Subscribe%20and%20save%2010%25%20off%20your%20next%20wall%20art%2C%20phone%20case%20or%20t-shirt%20purchase!|”]Subscribe and save 10% off your next wall art, phone case or t-shirt purchase![/vc_cta][/vc_column][/vc_row][vc_row][vc_column][vc_column_text]
Share this location report of the Severn Valley Railway with your friends and colleagues …. thanks! [juiz_sps buttons=”facebook, twitter, google, pinterest, digg, linkedin, stumbleupon, mail”]
Keeping up to date with the latest news, irrespective of its subject matter seems so time-consuming these days. The internet has evolved into a heaving behemoth of news updates, analysis, reanalysis, repurposing and re-posting. To keep on top of all the various happenings, I have been using Flipboard for my own personal article collection purposes. I like the ease of saving articles for reading at a more convenient time. So instead of simply becoming ‘another’ site rehashing and rewriting articles, I have created a couple of Flipboard magazines to share articles I find interesting with you guys n gals. This will make it a lot easier and more efficient to share news and technique articles I think you might find of interest, and save me a lot of time unnecessarily rehashing other people’s posts. You can read the articles first hand, I’ll provide the pointers so to speak. So, please find below links to the official GDMK Images Flipboard Magazines, I hope you find them interesting ……[/vc_column_text][/vc_column][/vc_row][vc_row][vc_column width=”1/3″][vc_raw_html]JTNDYSUyMGRhdGEtZmxpcC13aWRnZXQlM0QlMjJtYWclMjIlMjBocmVmJTNEJTIyaHR0cHMlM0ElMkYlMkZmbGlwYm9hcmQuY29tJTJGJTQwZ2Rta2ltYWdlcyUyRnBob3RvZ3JhcGh5LXRlY2huaXF1ZS1oZjJicnJiZ3klMjIlM0VWaWV3JTIwbXklMjBGbGlwYm9hcmQlMjBNYWdhemluZS4lM0MlMkZhJTNFJTNDc2NyaXB0JTIwc3JjJTNEJTIyaHR0cHMlM0ElMkYlMkZjZG4uZmxpcGJvYXJkLmNvbSUyRndlYiUyRmJ1dHRvbnMlMkZqcyUyRmZsYnV0dG9ucy5taW4uanMlMjIlMjB0eXBlJTNEJTIydGV4dCUyRmphdmFzY3JpcHQlMjIlM0UlM0MlMkZzY3JpcHQlM0U=[/vc_raw_html][/vc_column][vc_column width=”1/3″][vc_raw_html]JTNDYSUyMGRhdGEtZmxpcC13aWRnZXQlM0QlMjJtYWclMjIlMjBocmVmJTNEJTIyaHR0cHMlM0ElMkYlMkZmbGlwYm9hcmQuY29tJTJGJTQwZ2Rta2ltYWdlcyUyRnBob3RvZ3JhcGh5LW5ld3MtbzVjb2cwMTB5JTIyJTNFVmlldyUyMG15JTIwRmxpcGJvYXJkJTIwTWFnYXppbmUuJTNDJTJGYSUzRSUzQ3NjcmlwdCUyMHNyYyUzRCUyMmh0dHBzJTNBJTJGJTJGY2RuLmZsaXBib2FyZC5jb20lMkZ3ZWIlMkZidXR0b25zJTJGanMlMkZmbGJ1dHRvbnMubWluLmpzJTIyJTIwdHlwZSUzRCUyMnRleHQlMkZqYXZhc2NyaXB0JTIyJTNFJTNDJTJGc2NyaXB0JTNF[/vc_raw_html][/vc_column][vc_column width=”1/3″][vc_raw_html]JTNDYSUyMGRhdGEtZmxpcC13aWRnZXQlM0QlMjJtYWclMjIlMjBocmVmJTNEJTIyaHR0cHMlM0ElMkYlMkZmbGlwYm9hcmQuY29tJTJGJTQwZ2Rta2ltYWdlcyUyRmdkbWstaW1hZ2VzLW5ld3MtcGNwZGZnNDd5JTIyJTNFVmlldyUyMG15JTIwRmxpcGJvYXJkJTIwTWFnYXppbmUuJTNDJTJGYSUzRSUzQ3NjcmlwdCUyMHNyYyUzRCUyMmh0dHBzJTNBJTJGJTJGY2RuLmZsaXBib2FyZC5jb20lMkZ3ZWIlMkZidXR0b25zJTJGanMlMkZmbGJ1dHRvbnMubWluLmpzJTIyJTIwdHlwZSUzRCUyMnRleHQlMkZqYXZhc2NyaXB0JTIyJTNFJTNDJTJGc2NyaXB0JTNF[/vc_raw_html][/vc_column][/vc_row][vc_row][vc_column][vc_column_text]I hope you find plenty of interest in the GDMK Images Flipboard magazines. Thanks for reading and let me know your thoughts on my magazines Cheers Gary[/vc_column_text][/vc_column][/vc_row][vc_row][vc_column][vc_separator color=”sky” el_width=”70″][/vc_column][/vc_row][vc_row][vc_column font_color=”#00478c”][vc_cta h2=”Subscribe to GDMK Images” h2_font_container=”color:%2300478c” h2_google_fonts=”font_family:Arimo%3Aregular%2Citalic%2C700%2C700italic|font_style:400%20regular%3A400%3Anormal” h4_google_fonts=”font_family:Arimo%3Aregular%2Citalic%2C700%2C700italic|font_style:700%20bold%20regular%3A700%3Anormal” txt_align=”center” add_button=”bottom” btn_title=”Sign me up I want to know about new GDMK Images articles” btn_align=”center” shape=”round” style=”outline” color=”sky” btn_style=”outline” btn_shape=”round” btn_color=”sky” btn_size=”md” use_custom_fonts_h2=”true” use_custom_fonts_h4=”true” btn_button_block=”true” btn_link=”url:http%3A%2F%2Fstaging.gdmkimages.co.uk%2Fsubscribe-gdmk-images-newsletters%2F||”]Be the first to know when new GDMK Images articles are available[/vc_cta][/vc_column][/vc_row][vc_row parallax_image=””][vc_column][vc_column_text]
Share the GDMK Images Flipboard magazines with your friends and colleagues …. thanks!
I have long wanted to travel Europe by train. I recently had a short notice opportunity to travel so decided to have a test run of European train travel. Prague and Budapest have been on my list of places to visit for a long time and were at the top of the list of destinations.
This two part article gives details on some of the sites I used to research and book the trip and features a selection of photography tips for anyone planning a visit to either Budapest or Prague.[/vc_column_text][/vc_column][/vc_row][vc_row][vc_column][vc_column_text]
Researching Flights and Train Travel
The Man in Seat Sixty-One website is my go-to site to find reliable information about European train travel. I recommend this site if you have any plans to travel Europe by train. If you haven’t considered using the train to get about in Europe then have a look. It may well surprise you how easy and cheap it can be. Looking through the seat 61 website, I found there was a direct train service between Prague and Budapest. Ticket prices were a bargain starting at only €19!
To maximise the available time in both cities, I chose to fly from the UK. The first site I check for cheap flights is Skyscanner. I find Skyscanner is useful because you can choose broad searches. I selected ‘UK’ as the departing airport and ‘Prague’ as the destination and in no time had a selection of flights and prices. I repeated the search to get results for Budapest flights. Comparing flight prices showed flights to Budapest were cheaper. It made sense then to start this trip with a flight to Budapest and then catch a train to Prague.
For return flights, I searched for ‘Prague’ as the departing airport and ‘UK’ as the destination. The first search showed the cheapest flight was £69. I decided to check neighbouring countries to see if there was anything cheaper. I quickly found I could get an Easyjet flight from Berlin Schonefeld to Luton for £19!
I went back to Seat 61 to see how easy it would be to get from Prague to Berlin by train. There was a straightforward service available priced at €39.
So travel wise, everything looked straightforward – a flight to Budapest, direct train from Budapest to Prague, train to Berlin and flight home.
I used Trip Advisor to find suitable accommodation. A couple of well reviewed places were available in both Budapest and Prague so the trip was viable.
I chose to stay for three nights at the Akademia Apartments in Budapest and then two nights at the Charles Bridge Hotel in Prague.
Modern travel is amazing, within 10 minutes I had
booked flights with Jet2 and Easyjet
checked in on both flights
printed boarding passes.
received confirmation for five nights accommodation in two different countries
I returned to Seat 61 to find out about train tickets. The first leg from Budapest to Prague needed booking via the Hungarian Rail Operators website. The site is fairly easy to navigate and buy tickets as there are English versions of the web pages. Be aware there is no print at home option for tickets. When you buy a ticket, you get the usual email confirmation. This confirmation is an e-ticket with a 10 digit reference code at the top. When you arrive in Hungary you need to visit a main railway station. Here you can print your tickets from the internet ticket printing machines. These are blue coloured ticket machines dotted around the stations. Enter your 10 digit reference number and your tickets will be printed.
To find ticket prices for the second train trip from Prague to Berlin, the Seat 61 site advises checking prices on both the German Rail Website and the Czech Rail websites. Prices can vary on each site so you may save some money. I bought tickets from the bahn.de site for €39 each plus €2 per person for a reserved seat. These tickets can be printed at home.
Budapest Airport Transfers
With the key elements of travel and accommodation booked, I researched the smaller items such as getting to our accommodation and the best ways of travelling around at each destination.
The Budapest by Locals website is packed with lots of useful information and is a good read for anyone thinking of travelling to Budapest. TripAdvisor forums are also a useful resource. I found two real nuggets of useful information.
The first nugget was from TripAdvisor. A lot of people were recommending the Budapest Airport Shuttle minibus transfer service. This service takes you straight from Budapest to the doorstep of your accommodation. You can book your transfer in advance. Your confirmation email will include a booking reference.
After collecting your baggage at Budapest airport, simply follow the lines on the floor marked ‘Airport Shuttle’. The lines guide you straight to their booking kiosk. Give the person your printed confirmation and your minibus will be arranged. You are usually asked to take a seat and await your accommodation name to be called. This service is cheap and efficient as it literally drops you off at the steps of your accommodation. The airport is 25km from Budapest city centre and takes about 40 minutes in the rush hour. Budapest driving could be politely described as ‘enthusiastic’ and the shuttle is recommended as a convenient way to avoid this enthusiasm!
Budapest Travel Card
The second nugget of advice involved advice on the public transport network in Budapest. Budapest has an excellent public transport network including buses, trams and metro system. Two travel cards are available – the Budapest Card and the Travel Card. Both cards include free travel on all public transport for a set period of 24, 48 or 72 hours. The difference is that the Budapest Card includes some free entry or discounts to specified attractions and discounts at certain restaurants.
I recommend one of these two cards if you want to use public transport to get around the city.
The 24 hour Budapest Card is 4900 HUF or €17 each
The 24 hour Travel Card is 1650 HUF each or €5.30
There is a lot of discussion about the relative value of each card. On this trip, I found the Travel Card gave the best value. We didn’t have enough time to visit a lot of the attractions but needed to get around easily and cheaply.
If you were visiting for two or three days and intended to visit and enter a lot of attractions, then I would recommend the Budapest Card.
If you were only visiting for two or three days and just needed to get about cheaply then I would recommend the Travel Card.
One thing to note is that there are a lot of venues and discounts included with the Budapest card. You will need to get about a lot to get the most value from the Budapest card.
You can choose to buy individual tickets for your tram or metro trips but be very wary and vigilant in your use of individual tickets. There are several different types of ticket available with differing conditions. You MUST validate your individual tickets BEFORE starting your journey at the red machines on the Metro or in the trams. Ticket inspectors are extremely vigilant in checking tickets. Should you be found to have an invalid or unvalidated ticket they are renown for being extremely firm with transgressors. Significant on the spot fines and threats of police intervention are frequently mentioned on forums by tourists caught out.
I highly recommend the use of a travel card if you intend to use public transport as they do not need validating in any way. You just show the ticket to the inspector when asked.[/vc_column_text][/vc_column][/vc_row][vc_row][vc_column][vc_column_text]
Accommodation
As mentioned earlier, I used Tripadvisor to find suitable accommodation.
Budapest
In Budapest, we booked 3 nights in the Akademia Apartments on Akademia Utca. This is a one bedroomed self-catering apartment. The apartment is perfect for a couple as it provides all you need for a quiet break. Akademia Utca runs parallel to the Danube one street back from the riverbank. The Parliament building is about 200yds from the front door. If you know Budapest then you will understand how perfect this location is. You are right on the No 2 Tram Line and 350yds from the Kossuth Lajos ter on Metro line 2. This is particularly useful if travelling by train as this Metro line takes you directly to Budapest Keleti railway station.
Prague
In Prague, I booked the Charles Bridge Residence which is about 50 yds on the castle side of the Charles Bridge. The location is absolutely perfect. The Charles Bridge Residence rooms are massive with equally big and comfortable beds. I must mention Michal, the owner, who greeted us and checked us into our room. He is a top guy, extremely friendly and helpful. He arranged no hassle taxi transfers to and from the railway station at a discount rate which were invaluable as we arrived mid evening and had to leave early morning.
I can’t recommend Budapest highly enough as a great destination for photographers, albeit with a slight caveat discussed further below.
There is just so much of photographic interest to see. Below is just a small selection from dozens of places of photographic interest.
Shoes on the Danube
Hungarian Parliament building
Margaret Island
Chain bridge
Buda Castle
Fishermans Bastion
Danube Promenade
As fantastic as these places are in the day, they are utterly transformed at night when illuminated.
Although Budapest is busy with people bustling around, I felt totally safe even with all my photo equipment. At night, I had my tripod over my shoulder with my camera attached walking around and felt safe. I did exercise caution at all times and was always on the lookout for potential problems but never once felt uncomfortable.
The people are extremely friendly and the city is beautiful. As you look around it seems inconceivable the city and people were witness to such brutality and horror for so long.
There are many photos of Budapest on the internet, all very similar, so one of my aims was to capture a different viewpoint on these iconic locations.
Below is a selection of my alternative views on Budapest with the odd classic viewpoint thrown in.[/vc_column_text][/vc_column][/vc_row][vc_row][vc_column][vc_column_text]
Shoes on the Danube and the Danube Promenade
The promenade provides a nice leisurely stroll along the River Danube. From the Promenade you get great views of the magnificent Buildings and attractions on both sides of the river.
The shoes on the Danube memorial consists of 60 pairs of 1940s period shoes. They commemorate the Jews who were lined up on the Danube’s riverbank bank, executed and whose bodies fell into the river during 1944 and 1945.[/vc_column_text][vc_media_grid style=”load-more” items_per_page=”3″ gap=”3″ btn_add_icon=”true” btn_custom_onclick=”true” filter_size=”md” include=”36845,36844,36843″ grid_id=”vc_gid:1483967600932-ed90085e-6dac-1″][/vc_column][/vc_row][vc_row][vc_column][vc_column_text]
Hungarian Parliament Building
The architecture of the Parliament building is truly stunning. The building is of Neo-Gothic styling and was fully completed in 1902.[/vc_column_text][vc_media_grid gap=”3″ filter_size=”md” include=”18179″ grid_id=”vc_gid:1483967600935-4ac36050-b635-8″][/vc_column][/vc_row][vc_row][vc_column][vc_column_text]
Chain Bridge
The Chain Bridge is one of the central tourist attractions and one of the main crossings when visiting the different attractions. There are lots of opportunities to take photos of, and from, the bridge.[/vc_column_text][vc_media_grid element_width=”3″ gap=”3″ filter_size=”md” include=”18178,18177,18182,18181″ grid_id=”vc_gid:1483967600936-43862c54-e068-6″][/vc_column][/vc_row][vc_row][vc_column][vc_column_text]
Hungarian Photography Laws
So, after proclaiming the delights of photography in Budapest, here is the caveat mentioned in my introduction. In March 2014, the Hungarian government enacted a new ‘civil code’. The code makes it illegal to include a person in a photograph without their prior explicit permission.
If ‘Street Photography’, the capturing of candid day to day scenes, is your thing, then Hungary is not a country that should be high on your list of places to visit.
I have tried to find evidence of actual prosecutions under the modified ‘civil code’. To date, I can’t find any hard evidence of a prosecution for including a person in their photograph. Even so, I wouldn’t want to be the first and neither would you, so exercise caution when taking photographs in crowded areas.
I mentioned earlier how busy Budapest was. In reality, it is almost impossible to take general photographs without people appearing in the shot.
From a professional photographers standpoint, commercial photography in Hungary is fraught with potential problems. I have been reviewing the online collections of the major stock agencies. It seems there is a small number of images available with people in that obviously haven’t given permission. What I do see is a lot of ‘sterile’ photos without people.
What I take from this is that a small number of stock photographers are unaware of the ‘civil code’ changes. A larger number are aware and supplying ‘sterile’ people-less pictures.
That is a real shame as such a vibrant place deserves recording in its true beauty – of which people are a key ingredient.
The EU are studying the wider implications of Hungary’s civil code and is due to report in late June. Let’s hope the report clears up the situation for public photography in Hungary.
So, in summary, be careful if considering using your photography for commercial purposes.
Fortunately, an unintended consequence of the new code means there are plenty of reasons to experiment in close-ups, abstracts and long exposures!
If you are sensible with your people photography then I am sure there will be no problems. Nothing in my caveat detracts from the fact that Budapest is a stunning city, full of friendly people and I heartily recommend you to visit.
Thanks for reading, in part 2 I will focus on the trip from Budapest to Prague.
Please feel free to leave your thoughts and comments
If you liked this article then why not share it with someone you know who will also find it interesting …. thanks![juiz_sps buttons=”facebook, twitter, google, pinterest, digg, linkedin, stumbleupon, mail”]
I have owned the D7200 for just over a month now. This article aims to provide information to those wondering if the new Nikon D7200 can genuinely be considered as a D300 replacement (*update 06/01/16 – Nikon D500 released as D300 replacement*). There has been a lot of discussion about Nikons latest DX format DSLR camera. Many are unhappy that there has been no signficant upgrade over the D7100. Whilst this viewpoint may be somewhat justified, this article is aimed at people who haven’t recently upgraded their Nikon bodies. There is a significant population of photographers who have been waiting for the almost mystical D400 to replace the well respected Nikon D300. Many havent upgraded their camera bodies despite several iterations of Nikon DX format DSLR cameras being released. I purchased my Nikon D300 a couple of weeks after initial release just over 7 years ago. Camera sensors, image processors and AF capabilities have significantly improved in that time. Those who have used the D300 will agree with me that it is an extremely capable, robust and solid camera. Indeed, the D300 has been such a good camera that none of the recent releases have been a match for its capabilities. Newer cameras may have improved components and features but none have offered the overall package offered by the D300. A compromise in capability was always required to move away from the D300 – until now. I have been following the stories and rumours about a Nikon D400 for some time. As time goes by it seems less and less likely that this much anticipated camera will ever make an appearance. With this in mind, the Nikon D7200 caught my eye when Nikon announced its release. The D7200 feature list addressed most of what I needed in a camera body. I researched many articles to try and understand the full feature set of the D7200. After handling an example at the ukphotoshow, I took the decision to finally give in and upgrade. This article is written on the basis of my experiences moving from the D300 to the D7200.[/vc_column_text][/vc_column][/vc_row][vc_row][vc_column][vc_column_text]
Does size matter?
The first obvious feature of the D7200 camera body is its smaller size when compared to the D300. The size difference is not massive but is noticeable. The D7200 is as comfortable in the hand, and is lighter, but you do notice the smaller size. In the side by side photos shown below you can see the size difference of the Nikon D7200 v D300 when viewing from above, the front and rear.[/vc_column_text][/vc_column][/vc_row][vc_row font_color=”#00478c”][vc_column][vc_gallery type=”image_grid” images=”27205,27206,27207″ img_size=”full”][/vc_column][/vc_row][vc_row][vc_column][vc_column_text]The photos above illustrate the size difference but also show the many changes to the cameras controls. Most notable on the top view is the D7200s Mode Dial in place of the D300s dedicated Quality, ISO and WB buttons. The rear view shows a smaller Multi Selector pad on the D7200. You can see the focus area, meter area controls and dedicated AF-ON button controls are missing. I was concerned the removal of these buttons inferred that Nikon had removed key functionality. The D7200 still offers all the D300s functionality, and more besides, albeit the functions are accessed via different controls. Consequently, there is quite a learning curve as you adjust to using these common functions. I will admit to suffering from a bit of frustration as simple operations, that were once instinctive actions, have had to be re-learnt.[/vc_column_text][/vc_column][/vc_row][vc_row font_color=”#00478c”][vc_column][vc_gallery type=”image_grid” images=”27211,27210″ img_size=”full”][/vc_column][/vc_row][vc_row][vc_column][vc_column_text]
Nikon D7200 Ergonomics
There are two ergonomic issues I didn’t immediately like about using the D7200. I have to ask why certain simple actions have changed. The two images above illustrate my first dislike. The release dial on the D300 requires the index finger to operate the release button and a twist of the dial with your thumb. The D7200 design has reversed this meaning the thumb releases the dial button and the index finger twists the dial. For whatever reason this just does not feel as comfortable. Many times my index finger has been groping in vain for the release button. When I realise and try to release with the thumb it just feels weird. Secondly, the rear Multi selector pad is smaller on the D7200 and doesn’t have that smooth operation of the D300. The pad is also bulkier and just feels less precise in operation. Other than these two issues, the ergonomics of the D7200 are not too bad. Much of the ergonomic issues I have encountered result from having ingrained muscle memory from using the D300.[/vc_column_text][/vc_column][/vc_row][vc_row][vc_column][vc_column_text]
Nikon D7200 Operation
After getting past the size and different button arrangements, your next noticeable difference comes when you look through the D7200s viewfinder. You will see that the Focus Mode, Exposure Mode and ISO speed readouts (see update below) are missing. I really dont like this aspect of the camera and do not know why these features are missing. This camera is aimed at semi-pro and advanced amateur photographers, so why remove such a useful facility? The visual representation of this information in the viewfinder is a must have feature in any ‘advanced’ camera. You want to keep the camera to your eye and visual reminders in the viewfinder are crucial. Tsk tsk Nikon – dont think you can release a D7200b or D7250 to cover up for this omission because that wont wash. Back to comparing the D7200 to the D300. Every aspect of the cameras operation has changed and there is a fair learning curve in getting to grips with these changes. I guess this is expected considering the changes that have taken place with camera technology since the release of the D300. The new mode dial brings a lot more functionality to hand quickly. The displaced D300 buttons have been moved and relocated onto the cameras rear panel. The new dial on the D7200 allows quick access to some very useful functionality and I feel is an improvement.[/vc_column_text][vc_column_text]**Update**
I need to make a slight clarification in regard to viewfinder display information. Following Rods comment below, I double checked the viewfinder readout and found the ISO was showing.
This was enabled by using ‘Easy ISO’ mode in the custom menu settings. When Easy ISO mode is enabled, you control the ISO setting with your thumb on the rear command dial. Also, lo and behold, it enables ISO readout in the viewfinder.
Apologies for this oversight and I hope it hasn’t mislead too many people. I only recently dabbled with the Easy ISO mode and never noticed the correlation between the viewfinder readout and this mode.
The AF modes are a little confusing at first and will take a little time to adjust to. Your familiar 3 way C, S, M AF switch (Continous, Single, Manual) is replaced with a 2 way AF and M switch with a new central button. Essentially you now only choose either AF or M with the toggle. To access the differing AF modes, you hold in the new central button and select the AF mode with the Sub Command dial. To change the AF matrix configuration, hold in the button and rotate the Command dial. Throw in a new AF mode to the mix (AF-A which automatically selects between AF-S or AF-C depending on subject movement) and you have a rich recipe for confusion. If your chosen field of photography needs frequent swapping of focus modes and matrix configurations then you need to get out in the field and practice, practice, practice before you go to an important shoot!
Located above the AF Mode selector switch is a new Bracket button. The D7200 bracketing options have increased over the D300 giving you more creative flexibility.
One unexpected factor I noticed is the D7200s operation speed. I didnt notice this until I went out with both cameras (tele on the D7200 and wide angle on the D300). The D300 was noticeably slower in general operation and when firing off a series of shots. The D7200 has received criticism for its burst mode and poor high speed shooting capabilities. All I can say is when shooting 6 or 7 consecutive shots, the D7200 is noticeably faster than the D300 in getting those 6 or 7 shots off. I always regarded my D300 as perfectly capable for getting off continous sequences so am pleasantly surprised by this discovery.[/vc_column_text][/vc_column][vc_column width=”1/2″][vc_gallery type=”image_grid” images=”27209,27208″ img_size=”full”][/vc_column][/vc_row][vc_row][vc_column][vc_column_text]
Nikon D7200 Customisations
There is no denying it – the Nikon D7200 is a complex bit of kit. With this complexity comes a generous number of customisation options. Almost every button and function can be customised to tweak almost every camera mode. With a little time and experimentation, you can customise your own D7200 to become a highly personalised tool honed to your photographic niche. The trusty ‘My Menu’ option, whereby often used menu options are added to your own menu for quick access, is still available. Added to this are the two user settings, U1 and U2, on the mode dial. You can set very specific camera functionality and store it in one of two user slots. You can then quickly swap between these settings by moving the dial to U1 or U2 and load the settings. This is useful if you swap between two subjects that need different camera operation – for instance swapping quickly from fast sports photography to macro photography. Each of those scenarios need differing settings and these user slots make multiple setting changes very easy.[/vc_column_text][/vc_column][/vc_row][vc_row][vc_column][vc_column_text]
Nikon D7200 Ruggedness
The D7200 does not have the full armouring and water resistance of the D300. Many have commented that this is an obvious omission by Nikon. I have to agree somewhat, but also in the 7 and a bit years of owning a D300, I never dropped my camera to test its actual ruggedness. I will handle the D7200 with the same care so (fingers crossed) I wont have need to see how robust or brittle the newer camera is. As for weatherproofing, well I got caught in a monstrous rain shower on the Charles bridge in Prague. I am happy to say the D7200 and my lenses survived perfectly well. If the camera survived this downpour then I have no worries going forward in respect of weatherproofing.
A short clip from the rainstorm is shown below.[/vc_column_text][/vc_column][/vc_row][vc_row][vc_column][vc_video link=”https://youtu.be/q1CjwQpNHOI”][/vc_column][/vc_row][vc_row][vc_column][vc_column_text]
Nikon D7200 New Features
As mentioned the D7200 offers many new technologies and features that weren’t available at the D300s release. It goes without saying that the D7200 hardware is a significant upgrade over that employed in the D300. The sensor is a far more capable 24mp device as opposed to the original 12mp sensor. The image processor is 3 generations newer and the AF module is extremely capable. In short, and without getting into the technical intricacies of each component, the sensor, AF and image processing is very good. Moving on to the new features I particularly like some of the additions. I like the new quiet shutter mode. The cameras operation doesnt become silent, but is somewhat quieter for those situations where noise may be an issue. The AF-A mode could be interesting. To be honest I like to have direct control over the AF mode. I select either single servo or continous servo depending on the subject matter. I will experiment with this new AF-A mode to see if it is reliable and accurate enough to correctly identify subject movement. One feature I really like is the wireless control via mobile phone. The mobile app is available for both Android and Apple devices via their respective app stores. Once downloaded, you can connect the D7200 and mobile device via wireless and control the camera via Live View. The app will display the scene seen through the viewfinder and gives you the ability to trigger the shutter from your phone. This is perfect when the camera is placed in awkward positions and may save you a few aches and pains! The app has more functionality and is a great addition. One other feature that I like is the delayed shutter mode. You can select a predetermined time for the shutter to operate once the mirror has raised. This is ideal for those circumstances where the slightest camera movement may affect the sharpness of your image.[/vc_column_text][/vc_column][/vc_row][vc_row][vc_column][vc_column_text]
Is the D7200 really the D400?
From my viewpoint, the D7200 probably isnt the D400 per se. Having said that, the Nikon D7200 is an extremely competent and feature rich camera that I am sure will satisfy anyone waiting for Nikons next real move in the ‘semi-pro’ and ‘pro-sumer’ niche. The upgrade in sensor, AF Module and image processor is enough alone to justify my decision in upgrading to a D7200. Add in the features I discuss above and you have at hand an extremely competent camera. A camera that is capable of delivering top quality images coupled with an extremely useful range of features. Features that are customisable to such a degree that you can create a fine tuned instrument honed to your particular photography niche.
It may not be the D400 but the Nikon D7200 is definitely the camera I have been waiting for. Of most importance to me is the change to the D7200 hasnt compromised any of the capabilities my D300 provided. I now have an exceptional main camera and an extremely competent and proven back up. If the D400 never materialises then I have an exceptional camera that will serve me just fine for a long time. If the D400 does ever appear, then it will need a genre breaking feature set priced somewhere around the £1500 mark for me to even consider dropping the D7200.
I’m beginning to the think the D7200 has made the Nikon D400 irrelevant. The D7200 is set to serve me well for a long time and my next upgrade may not be the D400 at all, but a step up to Full Frame – now that is a completely different kettle of fish!
I hope this article has been informative.
I’d love to hear your views, so why not leave a comment below?
Thanks Gary[/vc_column_text][/vc_column][/vc_row][vc_row][vc_column][vc_separator color=”sky” el_width=”70″][/vc_column][/vc_row][vc_row][vc_column font_color=”#00478c”][vc_cta h2=”Subscribe to GDMK Images” h2_font_container=”color:%2300478c” h2_google_fonts=”font_family:Arimo%3Aregular%2Citalic%2C700%2C700italic|font_style:400%20regular%3A400%3Anormal” h4_google_fonts=”font_family:Arimo%3Aregular%2Citalic%2C700%2C700italic|font_style:700%20bold%20regular%3A700%3Anormal” txt_align=”center” color=”sky” add_button=”bottom” btn_title=”Sign me up I want to know about new GDMK Images articles” btn_align=”center” style=”outline” btn_style=”outline” use_custom_fonts_h2=”true” use_custom_fonts_h4=”true” btn_button_block=”true” btn_color=”sky” shape=”round” btn_shape=”round” btn_size=”md” btn_link=”url:http%3A%2F%2Fstaging.gdmkimages.co.uk%2Fsubscribe-gdmk-images-newsletters%2F||”]Be the first to know when new GDMK Images articles are available[/vc_cta][/vc_column][/vc_row][vc_row][vc_column][vc_column_text]
If you liked this article then why not share it with someone you know who will also find it interesting …. thanks![juiz_sps buttons=”facebook, twitter, google, pinterest, digg, linkedin, stumbleupon, mail”]
Part 2 finished with a bit of a conundrum. Does shutter priority mode have a use for aircraft photography? Well, worry not, all will be explained below.
So far we have looked at how to maximise the shutter speed to avoid blurred images caused by camera shake. A higher shutter speed in theory brings with it a sharper image and reduces the effects of camera shake. Beginners in aviation photography should be aiming for around 1/1000th of a second to minimise the chances of blur through camera shake.
I am now going to turn everything we have discussed on its head. In some cases a lower shutter speed is necessary. I will show in certain circumstances you should limit the shutter speed to a maximum of 1/250th of a second. It seems a little strange to now be discussing the use of slower shutter speeds – why?
Look at the image below and you will soon see why……..
Hercules with frozen prop movement
Can you see the problem?
The high shutter speed has frozen the movement of the propellers. This creates the impression the C130 Hercules aircraft is hanging in the sky.
This is not a good look and exactly why shutter priority mode should be used.
High shutter speeds are generally desirable BUT in certain situations you should choose a slower speed to realistically convey the scene.
I suggest you restrict shutter priority mode in aviation photography to when your subject is a propeller powered aircraft or when you want to show movement.
Shutter priority mode is most useful where you want to convey movement.
Look at the images below …..
Propellor aircraft conveying prop blurFlybe Dash 8 turboprop aeroplane landing into spring evening light
Do you think the propellers look more natural?
High shutter speeds are generally desirable BUT in certain circumstances you need a slower speed to correctly convey the scene
For propeller aircraft you should convey the turning movement of the props. It is a far more realistic look and will give your aircraft photos increased realism.
To achieve a realistic looking propeller blur, you should choose a shutter speed of around 1/250th of a second or lower.
You will find a bit of trial and error with shutter speeds is necessary to establish a realistic look to the propellers.
slower shutter speed = more blur
higher shutter speed = less blur.
Also bear in mind that different aircraft types have different propeller rotation speeds. You will need to choose different shutter speeds to convey a particular ‘look’ depending on the aircraft type.
Helicopters can be a real challenge as the rotors turn much slower. You should select a maximum shutter speed of around 1/160th of a second to capture a realistic rotor blur.
With such low shutter speeds you will need to use good camera handling technique. Good camera handling technique will help reduce camera shake when using low shutter speeds.
Part 4 of the series will look in depth will look at camera handling.
There has been some pretty heavy stuff in this series of posts. Take time to read and understand the discussions. When you put the theory into practice you should see an improvement in your aircraft photography.
A quick summary then
aim for shutter speeds of 1/1000th of a second to reduce the risk of blur through camera shake
convey movement by using shutter priority mode to select a lower shutter speed
a high shutter speed results in stationary propellers – not a good look
lower shutter speed brings a greater sense of movement
lower shutter speeds increase the risk of camera shake
In part 4, I will discuss some techniques to overcome some of the more demanding aspects of aircraft photography.
I will look at good camera handling technique including –
holding your camera and lens
your stance and posture
how body movement can affect the end photo.
I will also look at some advanced camera and lens features to further help and improve your aircraft photography.
Thanks for reading this post and I hope you have found something of use. I would love to hear your comments and feedback on the content above. It would be great to see any images you get using the techniques discussed in this post.
If you want to discuss any of the details in more depth then don’t hesitate to give me a shout