Recreate Your Favourite Locos and Aircraft
All our standard designs can be fully personalised!!
[vc_row][vc_column][vc_column_text]
Welcome to part 2 of my posts discussing and sharing photography trips in relation to our Ted on Tour USA road trip.
One technique I have been experimenting with is long exposure HDR. This technique is great for creating abstract effects and accentuating the illusion of movement. Read about how I approach long exposure HDR to create pictures with a wide dynamic range and enhancing a sense of movement in a scene.
Standard HDR photography doesnt usually feature movement. HDR is used primarily to capture a static scene that has a wide dynamic range between the highlights and shadows. Long exposure HDR, as the title implies, is the same concept of capturing a wide dynamic range, but uses long exposures. By the very nature of long exposures, you are going to record any movement of elements in your scene as either a blur or light streak.
Ghosting is caused by the tiny movement between each shot when hand holding a sequence of photos of the same subject. When you overlay these photos on top of each other, ghosting shows up as slight blurring around the edges of your static subject matter. If your camera is mounted on a tripod then ghosting is theoretically eliminated as the camera is steady between shots. Most HDR software allows you to control any ghosting when overlaying multiple pictures. HDR software will try to eliminate any ghosting when combining and processing the individual images into the final output image.
A series of long exposure pictures, particularly with people in the scene, will have plenty of blurred motion with the movement in each image drastically different to the previous. This movement can be used creatively by adjusting the ghosting settings.
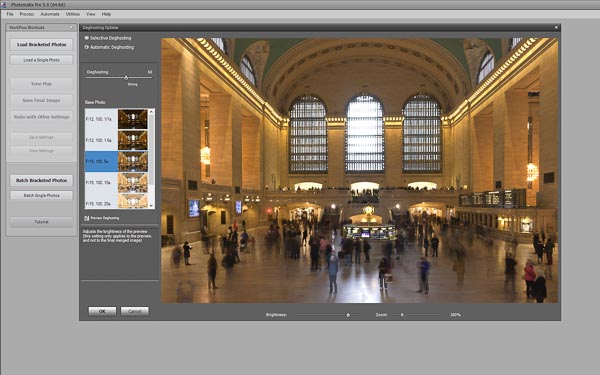
I took 5 seperate pictures of New Yorks Grand Central railway station concourse taken with exposures of –
The images were merged in Photomatix Pro. Both Lightroom and Photoshop have Merge to HDR features but I personally prefer using Photomatix Pro. The ghosting setting was adjusted to give the scene a pleasant overall sensation of the peoples movement. If you try this technique, move the ghosting slider and watch the motion in your images transform itself as the setting changes.
Use of the deghosting setting has a major effect on how the movement is portrayed in the finished HDR picture.
The pictures below show the difference between a deghosting setting of 0 on the left and at 64 on the right.[/vc_column_text][ess_grid alias=”new-york-grand-central-station-hdr”][/vc_column][/vc_row][vc_row][vc_column][vc_column_text]
I always tend to leave my HDR images for a day or two after the initial converting to a merged image. I do this because I like to come back with a fresh eye. There are so many variations of tone and contrast effects that I feel I become desensitised to the intense colours and contrasts inherent in HDR processing.
The small break allows me to come back with a fresh eye. I think its similar to eating rich food, after a while your taste buds become overwhelmed and the food doesnt taste as nice the more you eat. I definitely feel my visual acuity gets desensitised by the high saturation and contrast of newly merged HDR images.
Below is the completed long exposure HDR. The colour toning was applied seperately after conversion using Colour Efex Pro 4.[/vc_column_text][ess_grid alias=”new-york-grand-central-station-hdr-complete”][vc_column_text]Thanks for reading my take on long exposure HDR photography – I really hope you found it useful! There are links to more photography techniques below.
Let me know your thoughts in the comments section.
All the best for now
Cheers
Gary[/vc_column_text][/vc_column][/vc_row][vc_row][vc_column][vc_separator color=”sky” el_width=”80″][/vc_column][/vc_row][vc_row][vc_column width=”1/6″][/vc_column][vc_column width=”2/3″][vc_column_text]
[juiz_sps buttons=”facebook,twitter, google, pinterest, digg, linkedin, stumbleupon, tumblr, reddit, mail, bookmark”]
[/vc_column_text][/vc_column][vc_column width=”1/6″][/vc_column][/vc_row][vc_row][vc_column][vc_column_text]
[/vc_column_text][ess_grid alias=”new-photography=technique-blog-posts”][/vc_column][/vc_row]

[vc_row][vc_column][vc_column_text]
Following on from part 1 of our epic trip across America and the Caribean here is part 2 discussing the flight to, and our stay in, New York.
You will find tips about trip planning, some lessons learned, photography tips and our opinion on what we saw and experienced.[/vc_column_text][/vc_column][/vc_row][vc_row][vc_column][vc_column_text]
Our favourite planning sites are Skyscanner for flights and TripAdvisor for their reviews and forums.
Using Skyscanner, we found Norwegian Airlines had expanded its routes to include the USA using a fleet of new Boeing 787 Dreamliner aircraft. Their prices were extremely attractive when compared to the traditional long distance carriers. Norwegian airlines operate along the lines of budget airline where your basic fare covers a limited baggage allowance, a seat and nothing else. You can choose to buy upgrades such as bigger seats, more baggage and meals etc.
An added attraction for me personally with the Norwegian Airlines flight was the chance to try my first Boeing 787 Dreamliner flight. The only concern for such a big trip was the baggage limits of 20kg per passenger plus one carry-on bag each. For a 6 week trip that was quite a restrictive limit when including all my camera gear. Read about what camera gear I took and why. I will be writing a parallel photographers guide covering this trip. The reason for a seperate series is so people interested in the trip dont get bored reading technical photography information and those interested in photography might not be interested in the general travel posts.
No, not those weight issues, the 20kg weight limit! The limit was a little concerning and made us think carefully about what we really needed to take. The first thing we did was weigh our current cases. I nearly fell over when seeing one case weighed 6kg and the other 4.5 kg – and that was empty!! That set us off to look around the stores to see what lightweight luggage cases were out there. As it happens I needed some new storage boxes for our Art Stall so called in to Pound Stretcher. To our joint amazement they had lightweight travel cases that weighed a mere 1.5kg. Even better the cases were only £19.99! The lightweight cases were not particularly robust but had sturdy zips and decent looking wheels and extending handles. The lightweight cases measured just inside the maximum size we could check-in on the flight so it seemed a no brainer to buy a pair.
You dont know how pleased I was that I called in for the boxes first – it potentially saved hours of trolling around shops looking for cases!
All that was left was to work out what clothing to take. We made assumptions that New York would be fairly chilly, San Francisco and stops on the Pacific Coast Highway through to Las Vegas and the cruise would be warm. All the clothing needed to be lightweight and not too bulky. Based on this I packed a load of t-shirts and shorts, a couple of jumpers for New York and a couple of shirts and pairs of trousers for the cruise. Oh and my walking boots, trainers and one pair of shoes. That was me sorted in almost as much time as it took me to write this paragraph! If I ran short I could stop whenever needed and visit a laundrerette. Now then, I dont want to be sexist or stereotype anyone, but Mrs GDMK Images did take a little bit longer in selecting what to take. Quite a bit longer actually. Enough said.
The Norwegian Airlines flight we eventually chose was from London Gatwick to new York JFK with an early afternoon departure getting us into new York mid evening time.
Gatwick airport was an attractive departure point as it is easy to get to via train. I am fortunate that I receive limited free rail travel in the UK. This gives us some added flexibility to take advantage of the best air fare deals as we don’t need to add in the cost of rail travel to UK airports.
The following Rail Companies provide rail services to Gatwick Airport
The Thameslink service that crosses London from North to South is a particularly useful service if you are travelling from North of London and dislike the underground system. You can arrive into London St Pancras or London Kings Cross stations (they are directly next to each other) and go straight down to the low-level platforms. Thameslink trains from here go directly to Gatwick avoiding the London Underground system.
Alternatively, London Victoria has many services direct to Gatwick airport including the dedicated Gatwick Express service. Using London Victoria does involve crossing London via the underground, bus or taxi which adds an inconvenience if you have lots of luggage.[/vc_column_text][/vc_column][/vc_row][vc_row][vc_column][vc_column_text]
We took advantage of the online check-in offered by Norwegian Airlines so when we arrived at the Norwegian desk, baggage check in was ultra simple and quick.
I like to arrive at airports early and watch the aeroplane movements. Unfortunately, unknown to me, Gatwick airport is appalling for watching planes. There are virtually no airside views which was disappointing. There is an eating place with limited views but nothing exciting.
There is not a great deal to do at Gatwick airport before boarding. As with all airport departure areas, there are plenty of retail units full of alleged ‘bargain prices’ which in reality never seem to be the bargain they portray. I cross checked some offers on memory cards and camera bits with online retailers and there was virtually no difference in the prices. Duty-free shopping seems to have become another urban myth. The sort of myth that everyone tells you about but no-one has ever seen. I did hear you can get discounts, but only if you buy between 1207 and 1208 on every third Thursday while wearing green trousers and holding your left ear with your right hand and ask in Swahili. If you are successful with this method please let me know!
Whilst wandering around Gatwick Airport we did bump into one of Teds cousins![/vc_column_text][ess_grid alias=”Tedontourusa-part-2-New-York-Grid-1″][/vc_column][/vc_row][vc_row][vc_column][vc_column_text]
After a tiresome wait, we got the call for boarding. The Boeing 787 Dreamliner was brand spanking new complete with that ‘new car’ type smell! The seats and layout reminded me of a Boeing 757. We left the gate slightly late and must have missed our takeoff slot as we queued for a good 30 minutes to get onto Gatwick’s single runway. The volume of traffic using this runway is phenomenal. Planes seemed to be moving and queuing in all directions before gracefully merging into a single stream heading for the runway.
The Dreamliner turned out to be surprisingly, and somewhat disappointingly, cramped. There was barely sufficient leg room in the economy section for me at just under 6′ and not particularly long legs. If you have long legs you should definitely consider upgrading for the extra legroom.
The aisles also seemed to be quite narrow which caused several gridlocks as the cabin crew and passengers tried to move around during the flight.
Unfortunately, the in-flight entertainment system was out of service. We got to see the first 5 minutes of the new (at the time) Star Wars movie before the movie froze. We saw those 5 minutes 6 or 7 times as the crew tried repeatedly rebooting the system before eventually giving up. A lot of people were complaining, with a guy in front of us getting quite irate, but to be honest whats the point? The staff were obviously doing the best they could, but for whatever reason could not get the system working. These things happen and the staff were genuinely trying to sort the problem.
There is a lot of high-tech wizardry inside the Dreamliner. The windows don’t have blinds but auto tint according to the time of day. You have a manual control which alters the level of tint in the window. I felt like a little kid with a new toy adjusting the tint up and down from fully clear to almost black. Its really cool, honest! The cabin lighting also adjusts automatically as the day progresses into the evening. All very cool, well to me at least! The best bit was saved for landing. As the landing progresses through its descent, the side lighting slowly progresses through varying psychedelic colours. All very calming. I tried to grab a video but it came out blurred, a real shame because it was a really cool effect.
On the whole, the Norwegian Dreamliner flight was good except for the limited legroom. I can recommend using Norwegian Airlines for anyone looking for a cheaper flight to America. I will definitely use them again in the future.[/vc_column_text][ess_grid alias=”Tedontourusa-part-2-New-York-Grid-2″][/vc_column][/vc_row][vc_row][vc_column][vc_column_text]
The flight and landing at JFK was fine but it took 45 minutes to taxi to the gate. It took so long and there were so many turns I first thought they were taking us direct to times square!
Baggage collection was straight forward along with customs.
If you have been to New York, or have researched your first trip to new York, you should know about the chancers and scammers trying to relieve you of your hard-earned holiday money by offering to ‘assist’ you.
Well, I can confirm the rip off merchants hit you straight away. Immediately after collecting our baggage and heading for the taxis, we were approached by several people offering us taxi rides into the city. When asking how much for the ride, most were reluctant to give a price. I heard plenty of ‘don’t worry man it’ll be cheap enough’ or ‘we can sort price later’ and various amounts between $90 and $150.
All you need to know is that the reputable taxis operate a fixed scheme of $52 for a single person or $59 for more than one person from JFK to downtown New York. The taxis have a ‘JFK Flat Fare’ sticker on the side indicating they are part of the legit fixed fare system.
Make sure you get a yellow taxi from the official taxi rank bearing one of these stickers and confirm the fee before you get into the cab. Definitely, don’t let someone walking around the concourse talk you into following them or arranging a taxi for you. Just follow the signs to the taxi rank and you will come across plenty of legit taxis. The first lesson of being in New York is that nothing is done for free!
We chose to stay at the Hotel Stanford in Koreatown after reading the New York forums on TripAdvisor. I found some great information in theses forums and used the various forums extensively to research the whole trip. The Hotel Stanford on West 32nd Street turned out to be OK, nothing fancy, but close to Times Square and within walking distance of Penn Station (for our train to Chicago).
Our room in the Hotel Stanford had no view but we were not bothered as it was just somewhere to sleep. The Room was a good size with a large comfortable bed. The safe was a little small to be honest. A nice surprise was a complimentary bottle of champagne in room on arrival – result!
Breakfast was distinctly underwhelming consisting mainly of various bagels served in a smallish room just off the hotel lobby. There was a small selection of cereals and yoghurts and that’s your lot. The breakfast staff were friendly and efficient but room was as limited as the breakfast choices on offer. To be honest I would skip breakfast and get something while you are out and about.
As part of the initial trip planning process, we listed the New York sights we wanted to see and the things we wanted to do. We always do this to ensure we remain focused on what we really want to see and do. With such a massive city that offers so much, it is very easy to get sidetracked. Once you get sidetracked its all to easy to end up missing great chunks of what you want to see.
Our list of New York attractions, in no particular order included –
From a photographic standpoint, my list included –
[/vc_column_text][/vc_column][/vc_row][vc_row][vc_column][vc_column_text]
In the Tripadvisor forums, I read about the New York Pass. This is a tourist discount card that gives reduced or free entrance to attractions, discounts on eating and many other benefits. You also get to skip the queues at attractions and have access to the big bus hop on hop off tourist buses.
You can buy online or direct from a number of locations in the city. Just remember that any online offers or discounts won’t be available if you buy from a city outlet. At the time of our visit, there weren’t any great online offers that interested us so we decided to buy our New York Passes when we arrived. We chose to buy ours from Macy’s on West 34th street as it was just a couple of blocks up from the Hotel Stanford. If you enter Macy’s from the side entrance on West 34th Street you turn right and will see the steps up to the collection point. If you enter the front at Herald Square you need to go to your left. There are some steps up to the tourist attractions area where you can buy tickets for many attractions.
At face value, there is a lot to be saved with one of these cards but please be aware that, to get real value, you need to be careful on what you buy. If you only intend to see a few sights and maybe use the Big Bus service you might be better not getting a pass and just buying tickets for your attractions. New York is like all other big touristy cities – it’s massive with lots to see. It doesn’t matter what your preferences or likes are in regard to attractions, there is an immense amount to see and the New York Pass covers a large percentage of what most people will want to see.
To get good value from the New York Pass, You really need to get about between attractions to make a real saving. In this haste to get around the attractions, you are not going to have much time to savour them. Just bear that in mind when weighing up the costs of attractions versus the cost of a pass.
Its Difficult to decide if the New York Pass offers real value for money – the card does offer lots of attractions and discounts, but you have to get around a lot to make the most of it. This can potentially defeat the object of taking your time to enjoy the sights, especially if taking time to get photos. We weighed up the costs and decided to get the 3 day new York pass
For us, the inclusion of the Big Bus rides was a great feature. You can use the New York Subway to get around but we wanted to experience New York from above ground and the Big Bus rides do this perfectly.[/vc_column_text][vc_row_inner][vc_column_inner][vc_single_image image=”37937″ img_size=”full” alignment=”center” onclick=”link_image” title=”Ted waiting in Macys for his New York Pass”][/vc_column_inner][/vc_row_inner][/vc_column][/vc_row][vc_row][vc_column][vc_column_text]
I won’t beat about the bush – if it’s your first visit to New York then prepare to have all your senses assaulted. NYC can only be described as crazy and insane. The place is heaving non-stop with an endless flow of people on the sidewalks and vehicles on the roads. The soundtrack of New York is the car horn! The honking and beeping of car horns is literally non-stop from the minute you wake up till you drop off to sleep. There might be 20 cars stopped at a red traffic light but they will be honking and hooting irrespective of the reality that the lights are against them! I found this utterly hilarious.
The next oddity that struck me were the individuals walking briskly down the street having loud conversations seemingly with themselves. Most are shouting and at first you think they are calling out to someone across the street but they are actually on the phone! I Always thought a phone conversation was a private means of communication? Perhaps my age is showing? Now, it seems you can put the phone on loud speaker in order to hear the caller and hold the phone under your mouth, a bit like a plate, and shout into it above all the surrounding din to have a phone conversation.
Some use headphones to listen to the caller and hide the phone in a pocket and then shout even louder so they can be heard! I found these people caught me out more as they appear from nowhere and initially appear to be talking to you, until you see the earphone and realise they are on the phone! I see this occasionally in the UK but it is literally everywhere in New York. With everyone yelling into their phones, the incessant traffic noise and non stop car horn honking I felt a bit like, well – what the?!?!? Man, it is so confusing!
Anyway back to the trip. Big bus tours are great for getting an overview of the city. They have two separate services known as the Uptown Loop and Downtown Loop. Unsurprisingly one loop takes in the Uptown sights and the other takes in the Downtown sights.
I found the big bus tours great as they give you the opportunity to get your bearings in the city. They are also useful for getting photos from different angles. You get a great view into the workings of a busy city without intruding into the scene. They are brilliant for candid people shots. Each bus has a tour guide who give great insight into the city, it’s buildings, people, history and traditions. They highlighted many unusual and interesting tidbits during their talks which helped pick out bits you never would have noticed walking around on your own. You get a free pair of earphones when you join the bus and plug into a socket provided at each seat. The live commentary is obviously in English with a recorded option in several different languages. We Did both loops on our first day, one because we were tired and two to get a good initial overview of the city.
We also used the big bus tours to get between each attraction over the next two days. I found this a great relaxing way to get around.
One day was affected by heavy rain so we stayed on the bus during the worst of the storm. we sat upstairs as the first half dozen rows are covered and got some great creative abstract pictures through the rainsteaked windows.
Our Tour guides on the long tips were Steve McNeil, Lee and Jocelyn and they were great. There were others but we only did a couple of stops with them and I cant remember their names – oops sorry!.[/vc_column_text][ess_grid alias=”Tedontourusa-part-2-New-York-Grid-3″][/vc_column][/vc_row][vc_row][vc_column][vc_column_text]
We Planned to do the Empire State Building on the first day as the sun was setting and it was a great decision. We were well rewarded with an awesome sunset. It is a truly magical experience watching New York city transform itself from day to night.[/vc_column_text][ess_grid alias=”Tedontourusa-part-2-New-York-Grid-4″][/vc_column][/vc_row][vc_row][vc_column][vc_column_text]We decided to save the sunset boat trip for the last night and again were rewarded with a stunning sunset. Take note though, the calm waters are misleading. The wind was very strong and bitingly cold (in April at least) when out on deck so it is highly advisable to dress accordingly.[/vc_column_text][ess_grid alias=”Tedontourusa-part-2-New-York-Grid-5″][/vc_column][/vc_row][vc_row][vc_column][vc_column_text]
I particularly wanted some pictures of the American railways on this trip but didn’t get time to explore NY railways except for a few at the Hudson Yards depot at the start of our walk along the High Line.
The High Line is really cool. Its a great feat of railway engineering. The High Line is a railway line above street level that weaves around, and in some cases through, buildings. Today the High Line has become a little oasis elevated away from the frenetic pace below. Where trains once rumbled taking their goods to and from the docks, pedestrians can now get above the crazy streets and walk amongst flowers and grasses. The High Line oozes with an aura of calmness that is hard to describe and I loved it. Springtime is a great time to check out the High Line as the plants are bursting with spring vitality and colours.
From the High Line you are completely detached from the goings on below. You can take a leisurely stroll enjoying the engineering aspects of the structure, taking in the smells and sights of the beautiful gardens and enjoy an almost voyeuristic view of a seemingly detached world below you.
As you wander along, you get to see between buildings including old industrial units and apartments which are blended amongst the immense renewal and regeneration works that are everywhere you look.
As we joined the High Line at Hudson Yards, we were greeted by the sight of the incredible regeneration and building works that are touted to be Americas biggest real estate building project. As you continue along the High Line there are more building works right next to old run down apartment blocks. The contrast between the old and new, the soon to haves and definitely dont haves, is sometimes shocking.
[/vc_column_text][ess_grid alias=”Tedontourusa-part-2-New-York-Grid-6″][/vc_column][/vc_row][vc_row][vc_column][vc_column_text]
The Intrepid Sea, Air & Space Museum was OK although not as good as the USS Midway in San Diego in my opinion. We didn’t get to see the Enterprise space shuttle due to a ticket mixup. When we entered the museum I am positive we were advised to buy our shuttle tickets at the shuttle exhibition. When we got to the shuttle exhibition we were told we needed tickets from the main ticket office. We didn’t have time to walk all the way back to get tickets so had to give it a miss- a real bummer as the shuttle was something I really wanted to see.[/vc_column_text][vc_row_inner][vc_column_inner][vc_single_image image=”37943″ img_size=”full” alignment=”center” onclick=”link_image” title=”Ted and the USS Intrepid”][/vc_column_inner][/vc_row_inner][/vc_column][/vc_row][vc_row][vc_column][vc_column_text]
Not overly impressed with the rockefeller, it was OK, but that was about it. Views were ok, but boy it was cold and windy up there! Got some different skyline shots but didn’t hang around long as there was a big rainstorm blowing in.
Well what can you say? I Watched the entire events unfold live on TV back in the day so had always wanted to visit and pay my respects. Theres not much to say except how very sad and sombre. It was incredible to see the relics inside the museum and relate them to what I saw on TV. Everyone should go and see this memorial. It makes me so angry that despite such a tragic event, our so called ‘leaders’ of today seem to have failed to learn the lessons of history as to what fuels people to take such unthinkable actions.
Unfortunately we didn’t get time to walk any bridges or explore the rail systems in any detail. That was a real shame, but 3 days is just enough to cover the usual tourist suspects and not much time for anything else. Despite all our planning we just didnt have enough time.
It was getting real close to start getting ready for the epic Tras America train ride courtesy of the Lake Shore Limited and California Zephyr.
On the day of departure we decided to check our baggage in at Penn station in readiness for the train trip immediately after checking out of the Hotel Stanford. This left us baggage free to visit Grand Central Station for a last bit of sight seeing.
Big note here – if you are going to Emmeryville from New York and check your baggage in, you won’t see your checked in luggage again until you get off the train in California. Make sure you have enough clothing and anything you might want during the train journey. Things to consider are phone chargers, laptops, medication and a couple of days change of clothes and so on! You need to put these items in your carry on baggage else you gonna be in your same clothes for a long time and travelling with a flat phone, laptop or whatever charger you forgot!
Sparkle Wearing Off
Some of the sparkle was starting to rub off as we grew tired of the con men and women. Nearly every one who approached us claimed to be an ‘eye-rackie’ veteran or have a similar military deployment story which was a little wearing after a while . Dont get me wrong, I have the utmost respect for veterans of all nationalities, but these were just blatantly after the tourists. ‘I served here, I served there’, ‘my kids are starving blah blah’ ‘I can help you’ – ‘hit me a 20 man God bless you man’ – seemingly every 5 minutes was just too much after a while.
We have Been to a lot of countries and cities and can usually work past the scammers, but they are good in New York as I got caught twice.
One claimed to be working for the US equivalent of Help for Heroes (who we actively support in the UK ) and I got suckered in big time . It was only as we were walking away it dawned that we had been scammed. That really pissed me off because I thought I was genuinely helping out a good cause.
The second was in Penn Station when we were immediately met by a lady asking which train we wanted. I foolishly told her at which point she said right lets go. She was good as she was smartly dressed and very knowledgable. She started guiding us around the station in an ever confusing series of lefts and rights to end up back where we started. At this point she asked for a lot of dollars to my surprise. Immediately a Police Officer walked over and said ok Missy we have told you so many times leave these people alone and get out of here. Follow a big scene about starving kids, being evicted and so on. Not a great introduction to the Amtrak rail system!
Penn Station is a typical 70s/80s architectural bodge job. Think of an unglamorous Birmingham New St railway station (before the upstairs refurbishment) and you have New York Penn station. The sign posting is atrocious and perfect for the New York ‘entrepreuneurs’ to make themselves available to ‘help’ you as experienced above.
Penn station is big. You have the Amtrak tracks below the concourse with the LIRR Long Island Rail Road tracks below these and then the subway lines below these. Unless you are familiar with the place or know where to go it is very confusing if you rely on the signage. The ticket machines on each level only issue tickets for the trains on that level. It’s hard not to look like a confused tourist navigating the ticket buying and platform finding process. Which is exactly the last thing you want to look like with the proliferation of people waiting to take advantage of confused looking tourists!!
We decided to use the subway to Grand Central and that was another mistake. I have used many subway and urban transit systems across the world without any real problems but this is one experience I won’t be keen to repeat.
I picked up spotters communicating via phone and text. I know this sort of thing happens everywhere, it just seemed so brazen and blatent with little attempt to act covertly that worried me. I overheard one spotter identify a woman giving details of appearance, where she was heading and where her purse was. I also overheard a spotter describing me and where I had put my camera. To say the short trip was scary is an understatement. I had all my senses trained to see if we were going to get jumped or robbed. Well nothing happened but I won’t be going back any time soon.[/vc_column_text][/vc_column][/vc_row][vc_row][vc_column][vc_column_text]
Anyway, as you all probably know, New York Grand Central railway station is very grand and very beautiful. I didn’t feel comfortable to hang around too long and was very cautious using my kit. A real shame as I was really looking forward to this place and originally intended to stay longer. I wanted to explore some alternative views, but just didnt feel comfortable. Like I said, a real shame, but better that than anything else. Above all else I have learned to trust my intincts and didnt hang around or flash my kit about. I always say to people to trust their instincts, if something feels wrong then it probably is. I may have over-reacted or been over sensitive but who knows? The reality is I can always go back and get more photos another time.
It goes without saying that after getting some photos at Grand Central we walked on foot back to Penn station – even though it was hammering down with rain!
This left a bitter sweet taste in my mouth as we headed back to Penn station for the Lake Shore Limited train to Chicago. For one, I couldn’t wait to get boarded and away from any real (or at least perceived threat). Secondly, I couldnt help feeling a little cheated that, up until that moment, our great visit to New York had been a little bit spoiled.
Anyway, onwards and upwards as they say!
To get to Emeryville (the station for San Francisco) you need to catch the Lake Shore Limited train from New York Penn Station to Chicago. At Chicago you change trains and join the California Zephyr Train toEmeryville.
A full account of the trip to Emeryville will follow in part 3.[/vc_column_text][ess_grid alias=”Tedontourusa-part-2-New-York-Grid-7″][/vc_column][/vc_row][vc_row][vc_column][vc_column_text]
Whilst waiting for our train in the Amtrak departure lounge, I began digesting the sights and sounds we had experienced over the previous few days. I definitely had a sense that, when walking the streets of New York, I couldn’t see the wood for the trees. I had felt hemmed in by giant structures and surrounded by noisy hoards of cars and people which made it difficult in appreciating the beauty of the city. I also found it hard to relate to the classic and familiar landmarks amongst the morass of giant buildings. Once you get above street level or on the bus or boats, suddenly the familiar landmarks and skyline reveal themselves in all their beauty. I distinctly felt the true beauty of the city only revealed itself when you weren’t actually on the streets of it!?! How weird was that? This is the first major city I have visited and distinctly felt this way.
See more of the New York editorial stock images available via Alamy[/vc_column_text][vc_row_inner][vc_column_inner][vc_single_image image=”37945″ img_size=”full” alignment=”center” onclick=”zoom” title=”Waiting for the Lake Shore Limited”][/vc_column_inner][/vc_row_inner][vc_row_inner][vc_column_inner][vc_video link=”https://youtu.be/LJzK-LAxT-U” align=”center” title=”See America With Ted on Tour USA”][/vc_column_inner][/vc_row_inner][/vc_column][/vc_row][vc_row][vc_column][vc_column_text]
So there we were, waiting in the Amtrak departure hall at New York Penn station. I must admit to feeling that small child excitement building as departure time approached. You know the sort of butterflies and anticipation you used to get when you were a kid on a train trip to the seaside! Our first major American Railway trip was almost reality!
Join us in part three – Ted Heads West – to see how the trip to Emeryville panned out.
Thanks for reading our account of New York – I really hope you enjoyed it! Let us know your thoughts below
All the best for now
Gary[/vc_column_text][/vc_column][/vc_row][vc_row][vc_column][vc_separator color=”sky” el_width=”80″][/vc_column][/vc_row][vc_row][vc_column][vc_column_text]
[/vc_column_text][vc_row_inner][vc_column_inner width=”1/6″][vc_facebook type=”button_count”][/vc_column_inner][vc_column_inner width=”1/6″][vc_googleplus][/vc_column_inner][vc_column_inner width=”1/6″][/vc_column_inner][vc_column_inner width=”1/6″][/vc_column_inner][vc_column_inner width=”1/6″][/vc_column_inner][vc_column_inner width=”1/6″][/vc_column_inner][/vc_row_inner][/vc_column][/vc_row][vc_row][vc_column][vc_column_text]
[/vc_column_text][ess_grid alias=”location-reports”][/vc_column][/vc_row]

[vc_row][vc_column][vc_column_text]
The latest update to my editorial stock images contains pictures featuring Exeter and New York
Amongst the new stock images you can find the following mix of subjects
[/vc_column_text][ess_grid alias=”new-editorial-stock-images-jan-17-exeter”][/vc_column][/vc_row][vc_row][vc_column][vc_column_text]
The new editorial stock images of New York feature a wide range of subject matter including
Below is a selection of the newly added New York editorial stock images.[/vc_column_text][ess_grid alias=”new-editorial-stock-images-jan-17-new-york”][/vc_column][/vc_row][vc_row][vc_column][vc_column_text]All my new Exeter and New York editorial stock images can be found in my New Editorial Images lightbox on Alamy.
All my images are appropriately keyworded to make your search quick and easy – search all my Alamy pictures now
Please dont hesitate to contact me if you have any questions or specific needs
Thanks for Reading
Gary[/vc_column_text][/vc_column][/vc_row][vc_row][vc_column][vc_separator color=”sky” el_width=”80″][/vc_column][/vc_row][vc_row][vc_column][vc_column_text]
[/vc_column_text][vc_row_inner][vc_column_inner width=”1/6″][vc_facebook type=”button_count”][/vc_column_inner][vc_column_inner width=”1/6″][vc_googleplus][/vc_column_inner][vc_column_inner width=”1/6″][/vc_column_inner][vc_column_inner width=”1/6″][/vc_column_inner][vc_column_inner width=”1/6″][/vc_column_inner][vc_column_inner width=”1/6″][/vc_column_inner][/vc_row_inner][/vc_column][/vc_row][vc_row][vc_column][vc_column_text]
[/vc_column_text][ess_grid alias=”stock-photos”][/vc_column][/vc_row]

[vc_row][vc_column][vc_column_text]
We were recently lucky enough to undertake a 6 week tour of the USA and the Caribbean (of course you saw my #tedontourusa posts on social media!). The trip would see us eventually covering around 14,500 miles in 6 weeks. Locations included the East and West side of the USA followed by a whirlwind tour of the Caribbean.
I wanted to share the trip with you and pass on some lessons we learnt to help anyone planning an epic trip.
I will also be talking about the trip from a photographers point of view. Sections will cover photography technique and camera kit tips.
The trip came about for two personal reasons –
The trip would also allow me to set loose on new places with my camera.
This trip would also be our first major trip without our kids. It seems a bit silly but we had mixed feelings about undertaking such an epic trip without them. We have always thought it important to share our experiences as a family but they are grown up now. In reality, one was in the middle of a degree dissertation and the other wouldn’t get time off work. This is where Ted and the whole tedontourusa idea came about. Ted is our lucky mascot that goes to all our shows and events, so he became a surrogate kid for the trip![/vc_column_text][/vc_column][/vc_row][vc_row][vc_column][vc_column_text]
As with all big trips, you can go crazy with ideas for locations and places to visit. We had so many ideas for the USA trip that it looked like we would be there for a year! Anywhere and anything was open for consideration including the duration.
One of the dangers of planning a big trip is that all your ideas can get out of control. Another danger is failing to set out exactly what the trip should achieve. I know some people hate planning and being constrained, but it is easy to make mistakes. The ‘make it up as you go’ approach can be exciting but can lead to oversights. Oversights that can lead to missed opportunities, wasted money, frustration and generally not getting the most out of your experiences.
To bring a sense of order we listed our main wants and desires for the trip –
As for time constraints, we had shows up until 31st March and needed to be back before 18th May.
Originally we wanted to do an all rail trip. We decided that having never travelled across America by train before, we should err on the side of caution. We didn’t want to get off the first long distance train having hated the experience and have the prospect of more rail travel!
Having defined what we wanted out of the trip we started looking seriously at where we might go. From a mass of ideas, we had generated a useful list of what we wanted to experience and a time frame to fit the trip into.
[/vc_column_text][/vc_column][/vc_row][vc_row][vc_column][vc_single_image image=”14835″ img_size=”large” alignment=”center”][/vc_column][/vc_row][vc_row][vc_column][vc_column_text]
Having a structured list allows you to put some flesh onto the bones of your trip. Your list allows you to start researching specific locations and transport arrangements in more detail.
For our trip, we decided the core element would be the rail trip. Once we had figured out which rail trip we wanted to do we could look into where we would arrive in the US.
Amtrak operates the long distance passenger trains on the rail network in America. The Amtrak website has a lot of useful information including route maps, timings, route descriptions and of course prices. Looking through the site we selected several potential trains including
To find out more details on each of these trips I turned to one of my favourite rail planning sites – The Man in Seat 61. There is a detailed guide to getting around America by Train which is well worth studying. The various routes are discussed in depth along with explaining how to buy tickets. This independent information helps fill in some of the blanks we found on the Amtrak site.
Using the information from these two sites we went to Tripadvisor to look at the forums and FAQs to read first hand experiences of the various routes.
There were a lot of people recommending the California Zephyr as a great train, especially for those making their first US train trip. Weighing up the pros and cons of each we chose the California Zephyr.
Having decided upon the California Zephyr, it made sense to fly into New York. From New York we could catch the Lake Shore Limited to Chicago which gives a comfortable connection for the California Zephyr in the Windy City.
To find flights I mainly use Skyscanner, Kayak and Opodo. I search each and see what the best offers are. They give you plenty of options such as indirect flights, prices of flights to other airports near your search and are generally pretty good at rooting out some good deals.
Through these sites I discovered Norwegian were flying from Gatwick to New York JFK for just over £200 each if we took only one 20kg bag each. You could also take one carry on bag of the usual budget airline size. This was a very competitive price – almost 50% of the next cheapest flight. It did present a problem though – the baggage allowance. This turned into quite a challenge but considering the ticket price I was determined to fit all we needed into these limits. Anyway, as far as I was concerned as long as I could get my camera gear in, everything else was just wasted space. Unfortunately, Mrs GDMK wasn’t convinced of my reasoning and insisted I take some clothes as well as camera gear!
Finally, the morass of ideas were turning into a rough plan for stage one of the trip – fly to New York, train to Emeryville, just outside San Francisco.
To avoid internal flight, we next looked at different driving routes from San Francisco to Las Vegas. It soon became pretty obvious that there were two real options to get to Las Vegas. These were to either drive down the legendary Pacific Coast Highway or drive via Yosemite National Park before cutting across country to Las Vegas.
I did a lot of research on both these routes using the FAQs on the Tripadvisor California Forums. There is an awful lot of good information in these faqs and forums to help anyone planning a California trip. A list of sights and ‘things to see’ was formed and thrown into the melting pot of ‘potential’ venues.
Google Maps and Street View were extremely useful to research and get a better understanding of the areas discussed. Modern day trip planners have so many useful tools compared to 20 years ago. It is amazing to read peoples descriptions of a particular sight and then go online to see pictures of what they have discussed.
Geotagged photos on sites such as Flickr are useful to see what sort of pictures might be possible. It’s always nice to see sites full of the same old shots – it helps me prepare in advance when time on site is limited. It’s also invaluable for planning different views and angles.
With all this information, we worked through which sights we wanted to see and started working on a route from San Francisco to Las Vegas.
At the time we planned to travel, many of the higher Yosemite passes would still be closed due to snow. Suitable accommodation was not available in Yosemite, so we started to favour the Pacific Coast Highway.
The eventual route we decided was –
During the planning, we noticed a place called Hinkley just outside Barstow. This is the namesake of our hometown of Hinckley which just needed to be visited being as we were so close. As it turns out this was a fascinating place to visit that will be discussed in more detail later on in the series.
So we had a great trip taking shape. We had an exciting looking trip to get us into Las Vegas for the 25th Wedding Anniversary vow renewal. It seemed simple that we would then simply book a ceremony and fly home. Looking through the available flights on Skyscanner, Kayak and Opodo for flights back to the UK raised an eyebrow or two. The prices were rocketing – the cheapest flights were around 480 going through to £600, £700 and even £800. Even trying multi leg options couldn’t get what I would call a reasonable airfare home.
Here is where the trip takes a crazy twist. I’m looking at various Tripadvisor guides and see people talking about transitional cruises. It transpires these are standard cruises but involve the ship moving from one area of operation to another e.g. Caribbean to Europe. In order to make the transition the fares are very competitive.
Now, I’m not a cruise type person so have never looked into what a cruise holiday involves (except for usually handing over great wads of cash).
I started looking into these transitional cruises and noticed there was a 14 day cruise from Fort Lauderdale via the Bahamas to Southampton. Hmmm I thought, so how much is this going to cost? I nearly fell off my seat when the price came out as just over £600 each. That is £600 each for 14 days via the Bahamas to Southampton! Now weighing this cost against an airfare, pound for pound the difference was staggering. That unbelievable that I rang a tour operator and the cruise line direct to check there were no hidden costs. And holy macaroni there weren’t any hidden costs!
So I had the prospect of paying £600 – £800 for a direct flight or taking a 14 day cruise to get home – decadent, ridiculous, insane or just plain good fortune? I dont know, but I now had to see if we could shape the trip to allow us to get to Fort Lauderdale in time to catch the cruise without cutting out anything I had planned.
As it happens we could leave Las Vegas to Fort Lauderdale with a direct flight with Southwest Airlines. I know this would break the no internal flight concept, but what the heck this was for the bargain of the year!
[/vc_column_text][/vc_column][/vc_row][vc_row][vc_column][vc_column_text]
The trip was really coming to life. All we needed to do was decide in more detail what we wanted to do in each location so we could book the hotel accommodation.
We used the Anniversary ceremony date as the anchor point of the trip as that was set in stone. Using the list of sights at each location helped us decide how long to stay in each location. From here we worked backwards to find a date to Leave San Francisco. We added three days in San Francisco which gave us the day we wanted to arrive in San Francisco which in turn decided which day we should catch the Lake Shore Limited from New York. Adding in another couple of days to see New York gave us a rough departure date from the UK.
This backwards calculation gave us a tentative leaving date of 4th April. I checked the flight checker websites and found the cheapest flights were on the 6th April.
This was 2 days short of the roughly calculated date but it meant another £100 each saved, so the 6th of April became the departure date. I then went forward revising the dates to ensure we still arrived in Las Vegas in time for the Vow Renewal Ceremony.
I have used this iterative process many times before and find it really useful for planning trips with key dates.
Essentially you are taking a key date and anchoring that as a fixed point in your plan. The train trip is a fixed duration so automatically fills a defined space of floating time. The amount to see and do can be adjusted and are essentially flexible.
To start your trip plan add in your fixed elements as anchor dates – in our case the ceremony and cruise departure date. Add in your variable elements – in this case sights.
By working backwards from your anchor date you get to a point where you can slot in your floating fixed duration element.
This floating element can be moved later in time by removing the variables between it and the fixed anchor date. Likewise, it can be moved earlier in time by adding more sights.
Irrespective of the number of variables it remains the same duration – that is why it is a called a floating fixed duration element.
Working through our variables we arrived at the following
In order to get our plan to fit we had to drop a number of ‘like to do’ sights after prioritising the things we really wanted to do. The biggest effect was cutting the intended stay in Las Vegas from 8 days to 5 to ensure we could get across to the Cruise in time.
With these stops in mind, we needed to leave San Francisco on the 15th April. Again working back a couple of nights we needed to catch the Lake Shore Limited from New York on the 9th April to ensure we were in San Francisco in time to see the sights there before moving south. Leaving on the 9th April gave us a few days in New York after choosing the cheap flights on the 6th April.
Phew, a bit of to-ing and fro-ing but there you have it – our trip was planned!!
[/vc_column_text][/vc_column][/vc_row][vc_row][vc_column][ess_grid alias=”tedontourusa-grid-1″][/vc_column][/vc_row][vc_row][vc_column][vc_column_text]
So there we were, waiting for our departure date after turning a bunch of tags on a map into reality.
Before we knew it we were standing under that Norwegian departure lounge sign on the cusp of an awesome trip to the USA!
Tedontourusa was now reality!
[/vc_column_text][vc_video link=”https://youtu.be/LJzK-LAxT-U” align=”center” title=”See America With Ted on Tour USA”][/vc_column][/vc_row][vc_row][vc_column][vc_column_text]
Thanks for reading, I hope you have found this post useful. In Ted On Tour USA Part 2 – Gatwick to New York, I will be talking a little more about the planning along with an account of our stay in New York.
Feel free to leave comments and all the best for now
Gary
[/vc_column_text][/vc_column][/vc_row][vc_row][vc_column][vc_separator color=”sky” el_width=”80″][/vc_column][/vc_row][vc_row][vc_column][vc_cta h2=”Subscribe to GDMK Images” txt_align=”center” add_button=”bottom” btn_title=”Sign me up!” btn_custom_background=”#0098da” btn_custom_text=”#fffffd” btn_link=”url:http%3A%2F%2Fstaging.gdmkimages.co.uk%2Fsubscribe-gdmk-images-newsletters%2F|title:Subscribe%20Subscribe%20and%20ensure%20you%20keep%20up%20to%20date%20with%20Teds%20trip%20across%20the%20USA|”]Subscribe and ensure you keep up to date with Teds trip across the USA![/vc_cta][/vc_column][/vc_row][vc_row][vc_column width=”1/6″][/vc_column][vc_column width=”2/3″][vc_column_text]
[juiz_sps buttons=”facebook,twitter, google, pinterest, digg, linkedin, stumbleupon, tumblr, reddit, mail, bookmark”][/vc_column_text][/vc_column][vc_column width=”1/6″][/vc_column][/vc_row][vc_row][vc_column][vc_column_text]
[/vc_column_text][ess_grid alias=”location-reports”][/vc_column][/vc_row]