Posted on 2 Comments

Long Exposure HDR

Long exposure HDR deghosting 2

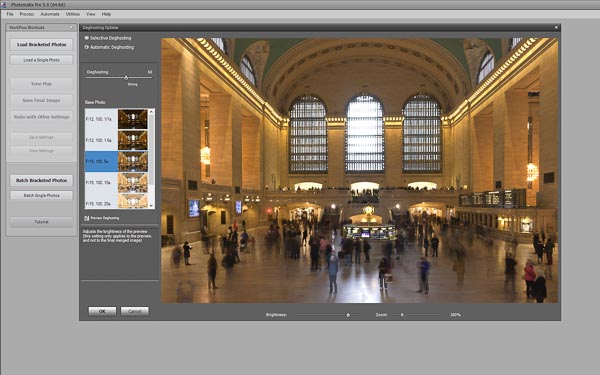
[vc_row][vc_column][vc_column_text]

Long Exposure HDR at New York Grand Central Station

Welcome to part 2 of my posts discussing and sharing photography trips in relation to our Ted on Tour USA road trip.

One technique I have been experimenting with is long exposure HDR. This technique is great for creating abstract effects and accentuating the illusion of movement. Read about how I approach long exposure HDR to create pictures with a wide dynamic range and enhancing a sense of movement in a scene.

Standard HDR photography doesnt usually feature movement. HDR is used primarily to capture a static scene that has a wide dynamic range between the highlights and shadows. Long exposure HDR, as the title implies, is the same concept of capturing a wide dynamic range, but uses long exposures. By the very nature of long exposures, you are going to record any movement of elements in your scene as either a blur or light streak.

Using Ghosting to Your Creative Advantage

Ghosting is caused by the tiny movement between each shot when hand holding a sequence of photos of the same subject. When you overlay these photos on top of each other, ghosting shows up as slight blurring around the edges of your static subject matter. If your camera is mounted on a tripod then ghosting is theoretically eliminated as the camera is steady between shots. Most HDR software allows you to control any ghosting when overlaying multiple pictures. HDR software will try to eliminate any ghosting when combining and processing the individual images into the final output image.

A series of long exposure pictures, particularly with people in the scene, will have plenty of blurred motion with the movement in each image drastically different to the previous. This movement can be used creatively by adjusting the ghosting settings.

I took 5 seperate pictures of New Yorks Grand Central railway station concourse taken with exposures of –

  • 20secs
  • 10secs
  • 5 secs
  • 2.5 secs
  • 1 sec

The images were merged in Photomatix Pro. Both Lightroom and Photoshop have Merge to HDR features but I personally prefer using Photomatix Pro. The ghosting setting was adjusted to give the scene a pleasant overall sensation of the peoples movement. If you try this technique, move the ghosting slider and watch the motion in your images transform itself as the setting changes.

Use of the deghosting setting has a major effect on how the movement is portrayed in the finished HDR picture.

The pictures below show the difference between a deghosting setting of 0 on the left and at 64 on the right.[/vc_column_text][ess_grid alias=”new-york-grand-central-station-hdr”][/vc_column][/vc_row][vc_row][vc_column][vc_column_text]

HDR Finishing Touches

I always tend to leave my HDR images for a day or two after the initial converting to a merged image. I do this because I like to come back with a fresh eye. There are so many variations of tone and contrast effects that I feel I become desensitised to the intense colours and contrasts inherent in HDR processing.

The small break allows me to come back with a fresh eye. I think its similar to eating rich food, after a while your taste buds become overwhelmed and the food doesnt taste as nice the more you eat. I definitely feel my visual acuity gets desensitised by the high saturation and contrast of newly merged HDR images.

Below is the completed long exposure HDR. The colour toning was applied seperately after conversion using Colour Efex Pro 4.[/vc_column_text][ess_grid alias=”new-york-grand-central-station-hdr-complete”][vc_column_text]Thanks for reading my take on long exposure HDR photography – I really hope you found it useful! There are links to more photography techniques below.

Let me know your thoughts in the comments section.

All the best for now

Cheers

Gary[/vc_column_text][/vc_column][/vc_row][vc_row][vc_column][vc_separator color=”sky” el_width=”80″][/vc_column][/vc_row][vc_row][vc_column width=”1/6″][/vc_column][vc_column width=”2/3″][vc_column_text]

If you liked this article on long exposure HDR then why not share it with someone you know who will also find it interesting  ….

[juiz_sps buttons=”facebook,twitter, google, pinterest, digg, linkedin, stumbleupon, tumblr, reddit, mail, bookmark”]


[/vc_column_text][/vc_column][vc_column width=”1/6″][/vc_column][/vc_row][vc_row][vc_column][vc_column_text]

Related Posts …..

[/vc_column_text][ess_grid alias=”new-photography=technique-blog-posts”][/vc_column][/vc_row]

Posted on Leave a comment

Choosing Camera Kit for an Epic Trip Made Easy

Lowepro Mini Trekker Camera Bag

[vc_row][vc_column][vc_column_text]

Ted on Tour USA – Choosing Camera Kit for an Epic Trip

Choosing Camera Kit for an Epic Trip is the first part of a new blog post series. This series will run parallel to our travel blog posts documenting our epic trip across America. This new series will feature the photographic related aspects of the 15000 mile trip.

In this first post I will discuss the process I used to choose what camera kit to pack for our 6 week Ted on Tour USA trip. I will also be providing background information and tips to some of the pictures taken on the first part of our trip from the UK to New York

Here are links to read an overview of the Ted on Tour USA trip and Ted on Tour USA Part 2 Gatwick to New York.

Alternatively check out the timelapse video below![/vc_column_text][vc_video link=”https://youtu.be/LJzK-LAxT-U” align=”center” title=”Ted on Tour USA Video”][/vc_column][/vc_row][vc_row][vc_column][vc_column_text]

Which Camera Bag?

Our Norwegian Airlines flight allowed us to check in one 20kg bag each and take one carry on bag each. We chose to use a Lowepro camera bags as our carry on bags. This ensured all the delicate camera kit would be kept with us and away from the dreaded baggage carousel system.

I have several camera bags and chose the following for this trip –

  • Lowepro Mini Trekker AW which is capable of holding an SLR Camera with a large telephoto lens attached and 4 or 5 other lenses
  • Lowepro Fastpack 350 which holds an SLR Camera with a small zoom and 3 to 4 other lens.
  • Lowepro Event Messenger 250 shoulder bag. Ideal for a camera and a couple of lenses and a laptop.

I chose the Mini Trekker because it can carry a ton of camera kit and will (just) hold my camera with Nikon 200-500 attached. I use this camera bag 90% of the time.

The Fastpack camera bag is great as it has a top compartment ideal for carrying a wide array of items. You can use it to hold all your leads and chargers or alternatively put a bit of lunch and some other bits in there. The Fastpack camera bag has a slide-in opening for a laptop and/or notepad tablets.

The Event Messenger is a great shoulder bag that is ideal for when travelling light. It also has a slot for laptops (up to 15″ screens) and notepad tablets. The Event Messenger camera bag would travel empty and flattened in our checked in luggage. This camera bag would be ideal for travelling light when we got to ‘the other side’ and I didnt necessarily want to carry all the gear around.

Prior to the trip I did seriously look at buying a roller bag along the lines of a Think Tank Airport or similar. I eventually decided against buying one as I wasnt absolutely sure the roller bag would be better than a backpack when transferring between trains and planes etc.

I have undertaken many trips and found the backpacks perfectly when dragging suitcases around. I didnt want to risk my first experience with a roller camera bag on such a big trip.[/vc_column_text][ess_grid alias=”choosing-camera-kit-camera-bags”][/vc_column][/vc_row][vc_row][vc_column][vc_column_text]

Choosing Camera Kit

When I am choosing camera kit to take on any trip, I always start by listing where I want to go and what sort of shots I want to get. I have many lenses ranging from 15mm through to 500mm so needed to work out which lenses to leave at home without compromising my flexibility.

Create a Shot list

From part 1 of planning an epic trip here is my brief shot list

  • City scenes
  • Railways
  • Aircraft
  • Abandoned buildings and vehicles, dereliction and abandonment

Mixed into this would be the obligatory general touristy type shots of wherever we went.

In order to select appropriate lenses I padded out the brief list above with some specific details[/vc_column_text][/vc_column][/vc_row][vc_row][vc_column width=”1/3″][vc_column_text]

New York

  • buildings
  • water towers
  • escape ladders
  • city skyline
  • shots from tall buildings
  • street scenes

[/vc_column_text][/vc_column][vc_column width=”1/3″][vc_column_text]

San Francisco

  • Golden Gate Bridge
  • trolly buses/cable cars
  • Alcatraz buildings

[/vc_column_text][/vc_column][vc_column width=”1/3″][vc_column_text]

Pacific Coast Highway

  • general vista’s
  • national parks

[/vc_column_text][/vc_column][/vc_row][vc_row][vc_column width=”1/3″][vc_column_text]

Route 66

  • old buildings
  • old cars
  • abandoned living

[/vc_column_text][/vc_column][vc_column width=”1/3″][vc_column_text]

Aircraft

  • Vegas Nellis AFB
  • Las Vegas McCarren Airport
  • Fort Lauderdale Airport
  • Joe Davis Airpark in Palmdale

[/vc_column_text][/vc_column][vc_column width=”1/3″][vc_column_text]

Railways

  • Around New York
  • California Zephyr
  • Tehachapi Loop

[/vc_column_text][/vc_column][/vc_row][vc_row][vc_column][vc_column_text]Putting more details into our shot list made it easier to break down the lens characteristics I would need

  • Aircraft pics would need long reach
  • Street photography would need flexibility in zoom length
  • National Parks I thought would need wide and low light capable
  • Aircraft museums would need wide view and low light capable

I always want to take all my camera kit on every trip but it simply wasnt practical on this trip. With this in mind I sort through all my kit and remove things I can justify leaving at home. I couldn’t foresee having the time to mess with flash or macro so it was easy to discount all my flash kit and macro lenses.

Working through the considerations I felt these lenses made sense

  • Nikon 200-500 f5.6 for airbases and airports
  • Sigma 18-200 C, Nikon 16-85 and Sigma 18-35 f1.8 A for Street photography
  • Nikon 50mm f1.8 because its so light I take it everywhere!

This lens selection would provide a lot of flexibility and cover pretty much every scenario encountered.

Cameras

Choosing cameras is always a lot easier – I always take all 3 cameras!

  • Nikon D7200
  • Nikon D300
  • Sony NEX6 with 16-50 lens

I usually keep the Nikon 16-85 on my D300 for general shots. I then use my Nikon D7200 with whatever specialist lens capability I want.

The Sony NEX6 is great for general pictures plus video. Its so small and light yet the picture quality is fantastic.

Camera Accessories

I also threw (metaphorically) these filters and accessories into the bags –

  • Hoya Pro 1 circular polariser filter for 16-85 and 18-200 due to potential haze and glare on the Pacific Coast highway and in the desert
  • A selection of different rated neutral density filters for creative work
  • Manfrotto 055 tripod
  • Manfrotto Ball head 057 Magnesium Ball Head with Q5 Quick Release
  • Manfrotto 035 Universal Super Clamp
  • Memory cards – as many as I could get into my bags
  • Laptop
  • Spare batteries
  • Chargers for everything

Apart from the cameras, lenses, laptop and notebook tablets, everything else would go in the suitcases. The camera bags would be heavy enough, so all of the robust non essential stuff would go into the suitcase.[/vc_column_text][/vc_column][/vc_row][vc_row][vc_column][vc_column_text]I have to make special mention of the Manfrotto Universal Super Clamp. This single piece of kit is simply amazing! Combine it with the ball head and you have a really useful tool for when a tripod either isnt allowed or there isnt sufficient space. It can be a bit unwieldly, but the flexibility if you can find a mounting point, is fantastic.

The jaws open wide and it clamps to pipes, railings, poles – pretty much anything. With the ball head fitted you can move your camera around irrespective of the fixings orientation. You do need to ensure there is a reasonable amount of clearance around your fixing point to allow your head and camera to be moved. It’s fantastic though and has made many long exposure shots possible that I would otherwise have missed or at least struggled to get.[/vc_column_text][ess_grid alias=”manfrotto-super-clamp”][vc_column_text]

Camera Kit Complete

So after working through my shot list I had finally decided on what camera kit to take.

  • Nikon 200-500 f5.6 for airbases and airports
  • Sigma 18-200 C, Nikon 16-85 and Sigma 18-35 f1.8 A for Street photography
  • Nikon 50mm f1.8 because its so light I take it everywhere!
  • Nikon D7200
  • Nikon D300
  • Sony NEX6 with 16-50 lens
  • Hoya Pro 1 circular polariser filters
  • A selection of different rated neutral density filters
  • Manfrotto 055 tripod
  • Manfrotto Ball head 057 Magnesium Ball Head with Q5 Quick Release
  • Manfrotto 035 Universal Super Clamp

[/vc_column_text][/vc_column][/vc_row][vc_row][vc_column][vc_column_text]

Creativity and Improvisation

I’m always on the lookout for unusual shots and angles from the moment I leave the door. I knew the low level Thameslink platforms would provide a nice low light opportunity. I like long exposures and low light photography so was interested in the potential for blurred motion pictures of the trains arriving and departing. The long exposures are also great for getting people to show up as shadowy characters as they walk along the platforms.

I used the suitcases as a stable rest and the cameras built in timer in place of a tripod and release cable to get some pictures of the trains arriving and departing. Just because my tripod was packed in the suitcases didnt mean I wasnt going to take some long exposure photos. I moved the cases around to suitable places on the platform and took a number of long exposures. If you dont have anything with you put your camera on the floor, or on seats, bins – anything that is stable will do! Be creative and use the things to hand! Just be sensible – dont use improvised items right at the edge of platforms or block entrances and exits, you know the score!

I had hoped to get some aircraft photos whilst at Gatwick but the views were useless. I didn’t bother getting any photos in the departures lounge and surrounding area as basically there wasn’t a lot of scenes that caught my interest. I just didnt feel the ‘vibe’ and didnt feel the effort worth risking the attention from the heavy security presence for the meagre pickings on offer.

Shooting From on High

In part 2 – Gatwick to New York I mentioned we used the open top Big Bus tours to get around New York. These open top buses were great for orientating ourselves in a new city. From a photographers point of view they are great for several reasons –

  • The tour guides provide a great insight and point things out you would likely miss if unescorted
  • you see things you may not see from the ground
  • the elevated position gives you a different view of your chosen subject
  • people are unaware of your presence so there are great candid picture opportunities

Unfortunately there are a few downsides to the Big Bus tour buses for photographers –

  • an obvious lack of opportunity to ‘work’ a scene from different viewpoints
  • your fixed viewpoint means you almost always need a superzoom
  • other passengers on the bus getting in the way!

One additional bonus I didn’t anticipate with Big Bus tour was on the rainy days. I got some great abstract pictures of rainstreaked windows combined with the array of city lights. We also got to see the city and keep dry!

The Manfrotto Super Clamp would also come into its own for the views from high rise buildings. Tripods are a definite no no in most high rise buildings and, in reality, the volume of people around you makes them almost impossible to use. Most of the places we visited had some sort of railing or fixing I could use to stabilise the camera. As said before, the Super Clamp is a great piece of kit. In a couple of places I noticed the security guys watching me use the clamp. I could almost hear them wanting to scream ‘Excuse me Sir, you cant do that’ but obviously couldnt find an excuse to say it!

Below are examples from the scenarios discussed above.[/vc_column_text][ess_grid alias=”choosing-camera-kit-grid”][/vc_column][/vc_row][vc_row][vc_column][vc_column_text]

Part 2 – Long Exposure HDR

One technique I have been trying out is long exposure HDR. I wanted to try this technique out at New York Grand Central Station. This is an iconic location that has plenty of character and is perfect for standard HDR but has the added element of being very busy.

In part 2 I will show the results and discuss the techniques used.

Thanks for reading about how I chose which camera kit to take – I really hope you found it useful! Let us know your thoughts below

All the best for now and hope to see you in part 2!

Gary[/vc_column_text][/vc_column][/vc_row][vc_row][vc_column][vc_separator color=”sky” el_width=”80″][/vc_column][/vc_row][vc_row][vc_column][vc_column_text]

If you liked this article then why not share it with someone you know who will also find it interesting  …. thanks!

[juiz_sps buttons=”facebook,twitter, google, pinterest, digg, linkedin, stumbleupon, tumblr, reddit, mail, bookmark”][/vc_column_text][/vc_column][/vc_row][vc_row][vc_column][vc_column_text]

Related Posts …..

[/vc_column_text][ess_grid alias=”location-reports”][/vc_column][/vc_row]

Posted on Leave a comment

Gloucestershire Warwickshire Railway 2016 Diesel Gala

Ted on the GDMK Images stall inside the diesel shed at Toddington on the Gloucestershire Warwickshire Steam Railway

[vc_row][vc_column][vc_column_text]

Gloucestershire Warwickshire Railway 2016 Diesel Gala

We had the pleasure of attending the recent diesel gala at the Gloucestershire Warwickshire Steam Railway.

Our stall was located inside the diesel shed at Toddington which created a great atmosphere for the event surrounded by locos under restoration and all the associated engineering equipment.

In the shed was D1693 (47105) undergoing a thorough restoration by its owners the Brush Type 4 Fund. The class 47 loco was used extensively on all sorts of freight and express passenger duties all over the UK network and a small number are still in use today. Over 500 of these locos were built and several are preserved or under restoration on preserved railways around the UK.

The groups other Class 47 loco, 47367, was in use during the diesel gala and is painted in Railfreight grey Freightliner colours as carried in the 90s.

[/vc_column_text][/vc_column][/vc_row][vc_row][vc_column][vc_column_text]

Class 47 47105 Under Restoration

[/vc_column_text][ess_grid alias=”47105-under-restoration”][/vc_column][/vc_row][vc_row][vc_column][vc_column_text]

Rare Class 20 

Next to this was a very rare class 20 loco. This loco, currently numbered 2001, was part of the CFD fleet which worked in connection with the construction of a high speed rail link in France. In British Rail service the loco was numbered 20035. 20035 went to France in around 1992 but was never very reliable in service for its French operator. It spent a long time out of service following mechanical breakdowns and eventually returned to the UK in 2005. It is in a very poor condition and is being used as a source of spares for the other class 20 loco on the railway D8137 (20137) and the owners other class 20 (20228) based at Barry. Once component recovery is completed the shell will most likely be scrapped.[/vc_column_text][vc_single_image image=”18050″ img_size=”large” alignment=”center” onclick=”link_image”][/vc_column][/vc_row][vc_row][vc_column][vc_column_text]

Growler Groups Stunning Restoration of 37248

One of the highlights of the diesel gala was the use of English electric Class 37 D6948 (37248) which is looking absolutely immaculate following a thorough rebuild and looks as good as the day it entered service in 1964.

This loco is owned by the Growler Group which is based on the railway with its stablemate 37215.

37215 has been restored into BR Blue colours as it would have looked in the 1970s and 1980s whilst D6948 carries its original BR Green colours in which it was delivered to British Rail.

The Growler Group had their publicity stand in the diesel shed with us and several other stall holders. Ted took the opportunity to join the Growler Group as he was very impressed with their locos.

Below are two short videos of their Class 37s. The first shows the stunning quality of 37248s restoration into as built condition. The second shows 37215 departing Toddington with a train.[/vc_column_text][vc_row_inner][vc_column_inner width=”1/2″][vc_video link=”https://youtu.be/bZJLjPfAPjQ” title=”Class 37 37248″][/vc_column_inner][vc_column_inner width=”1/2″][vc_video link=”https://youtu.be/973N4pFxRtA” align=”center” src=”“https://www.youtube.com/embed/973N4pFxRtA“” width=”“560“” height=”“315“” frameborder=”“0“” title=”Class 37 37215″][/vc_column_inner][/vc_row_inner][/vc_column][/vc_row][vc_row][vc_column][vc_column_text]

Ted Gets to Grips With a Class 47

Following Teds recent flights in the C-47 Skytrain and B-17 Flying Fortress Sally B, Ted jumped at the chance to get to grips with a main line diesel loco. Class 47 D1693 (47105) was open to inspect so Ted dived at the chance to sit in the driver’s seat of this 95 mph main line mixed traffic loco.[/vc_column_text][/vc_column][/vc_row][vc_row][vc_column][ess_grid alias=”ted-drives-a-class-47″][/vc_column][/vc_row][vc_row][vc_column][vc_column_text]

Gloucestershire Warwickshire Steam Railway History

The Gloucestershire Warwickshire Railway runs through the stunningly beautiful Cotswold countryside. The heritage railway was originally part of the Great Western Railway’s main line from Birmingham to Cheltenham, via Stratford-upon-Avon. Work started in 1900 and was completed by 1906.

The line was closed to Passenger traffic in March 1960. The Gloucestershire Warwickshire Steam Railway was formed in 1981 with the intention to re-open the line from Stratford Race Course to Cheltenham Racecourse. The line was originally double tracked throughout but now consists of a single line with passing loops at stations.

The railways operating base was established at Toddington. The railway restored 1/4 of a mile in 1984 and the first trains operated in the same year. There is now just over 12 miles of track from Laverton to Cheltenham Race Course with an almost complete northern extension to Broadway.

The railway predominantly runs steam hauled trains with regular turns for its diesel loco fleet.[/vc_column_text][/vc_column][/vc_row][vc_row][vc_column][vc_column_text]

Preserved Locomotives Based on the GWSR

The GWSR has a wide range of locomotives and their associated owning and support groups based on the railway. Below is a listing of steam and diesel locos based at the time of the 2016 diesel gala. I have included links to their owning groups. Please take time to have a look at the groups pages as you will find much of interest about the respective groups locomotives. Each of these groups are to be applauded for the excellent restorations of their locos which are a tribute to their hard work.

Steam locos based on the GWSR

Diesel locos based on the GWSR

[/vc_column_text][/vc_column][/vc_row][vc_row][vc_column][vc_column_text]The gala featured most of the home diesel loco fleet plus class 33 D6575 (33057) visiting from the West Somerset Railway.

Crowds seemed healthy enough, with trains seemingly well loaded with happy punters, so hopefully the railway will make sufficient profit to ensure many more of these great events can be run.

[/vc_column_text][/vc_column][/vc_row][vc_row][vc_column][vc_column_text]

Locos Taking Part in the GWSR Diesel Gala

[/vc_column_text][ess_grid alias=”GWSR-diesel-gala-2016″][/vc_column][/vc_row][vc_row][vc_column][vc_column_text]

Railway Photography Tips – Abstract Pictures

Railway Galas quite often provide us with quiet periods after each train has departed. Apart from allowing us to take a breath from selling and answering questions about my art style, I like to hunt out abstract picture opportunities.

There are photo opportunities everywhere and many times I like to look for abstract scenes that would look good in black and white or subjected to various colour treatments.

Railways are full of picture opportunities. Of course everyone wants to get the standard shots of the ‘big’ attractions, but for the following week, social media is awash with similar pictures of locos all looking sort of well …. similar. ‘Record shots’ are everywhere, don’t fall into becoming a ‘record shot’ photographer.

Push yourself to break the mould and look for different opportunities. Low angle, ground level, high vantage points, close-up and abstract picture opportunities are all around you. Challenge the inner photographer in you and find something different. Many pictures might well turn out pants, but some will be a little bit special. Many more efforts will let you know you are on to something different and next time you will know to get a little higher, a little lower, a bit closer or indeed further away.

Do something different. Your eye will develop and you will create your own style. Become a railway photographer rather than someone who takes pictures of trains.

Below is a selection of picture scenes I hunted out.[/vc_column_text][/vc_column][/vc_row][vc_row][vc_column][ess_grid alias=”abstract-pictures-at-gwsr”][/vc_column][/vc_row][vc_row][vc_column width=”1/3″][vc_column_text css=”.vc_custom_1498680345351{margin-top: 5px !important;margin-right: 5px !important;margin-bottom: 5px !important;margin-left: 5px !important;border-top-width: 1px !important;border-right-width: 1px !important;border-bottom-width: 1px !important;border-left-width: 1px !important;border-left-color: #0098da !important;border-left-style: solid !important;border-right-color: #0098da !important;border-right-style: solid !important;border-top-color: #0098da !important;border-top-style: solid !important;border-bottom-color: #0098da !important;border-bottom-style: solid !important;border-radius: 5px !important;}”]

See All Railway Pictures

[/vc_column_text][/vc_column][vc_column width=”1/3″][/vc_column][vc_column width=”1/3″][vc_column_text css=”.vc_custom_1582632738734{margin-top: 5px !important;margin-right: 5px !important;margin-bottom: 5px !important;margin-left: 5px !important;border-top-width: 1px !important;border-right-width: 1px !important;border-bottom-width: 1px !important;border-left-width: 1px !important;border-left-color: #0098da !important;border-left-style: solid !important;border-right-color: #0098da !important;border-right-style: solid !important;border-top-color: #0098da !important;border-top-style: solid !important;border-bottom-color: #0098da !important;border-bottom-style: solid !important;border-radius: 5px !important;}”]

Licence Railway Pictures

[/vc_column_text][/vc_column][/vc_row][vc_row][vc_column][vc_column_text]

I hope you have enjoyed the photos and my overview of the diesel gala, please feel free to leave any comments below

All the best for now

Gary[/vc_column_text][/vc_column][/vc_row][vc_row][vc_column][vc_separator color=”sky” el_width=”80″][/vc_column][/vc_row][vc_row][vc_column][vc_cta h2=”Subscribe to GDMK Images” txt_align=”center” add_button=”bottom” btn_title=”Sign me up!” btn_custom_background=”#0098da” btn_custom_text=”#fffffd” btn_link=”url:http%3A%2F%2Fstaging.gdmkimages.co.uk%2Fsubscribe-gdmk-images-newsletters%2F|title:Subscribe%20never%20miss%20an%20update!||”]Subscribe and never miss an update![/vc_cta][/vc_column][/vc_row][vc_row][vc_column][vc_column_text]

If you liked this article on the Gloucestershire Warwickshire Railway Diesel Gala then why not share it with your family and railway enthusiast friends .… thanks!

[/vc_column_text][/vc_column][/vc_row][vc_row][vc_column][vc_column_text]

Related Posts …..

[/vc_column_text][ess_grid alias=”location-reports”][/vc_column][/vc_row]

Posted on 4 Comments

Aircraft Photography Tips Part 3 – Why Use Shutter Priority Mode?

Shutter priority selected on a Nikon D7200 camera mode selector dial

Why Use Shutter Priority Mode in aviation photography?

Here is the third instalment in my aircraft photography tips series. If you have missed the first 2 parts then follow the links below to catch up.

Aircraft photography tips part 1 looked at cameras and lenses

Aircraft photography tips part 2 looked at camera modes and discussed exposure basics

Part 2 finished with a bit of a conundrum.  Does shutter priority mode have a use for aircraft photography? Well, worry not, all will be explained below.

So far we have looked at how to maximise the shutter speed to avoid blurred images caused by camera shake. A higher shutter speed in theory brings with it a sharper image and reduces the effects of camera shake. Beginners in aviation photography should be aiming for around 1/1000th of a second to minimise the chances of blur through camera shake.

I am now going to turn everything we have discussed on its head. In some cases a lower shutter speed is necessary. I will show in certain circumstances you should limit the shutter speed to a maximum of 1/250th of a second. It seems a little strange to now be discussing the use of slower shutter speeds – why?

Look at the image below and you will soon see why……..

Can you see the problem?

The high shutter speed has frozen the movement of the propellers. This creates the impression the C130 Hercules aircraft is hanging in the sky.

This is not a good look and exactly why shutter priority mode should be used.

High shutter speeds are generally desirable BUT in certain situations you should choose a slower speed to realistically convey the scene.

I suggest you restrict shutter priority mode in aviation photography to when your subject is a propeller powered aircraft or when you want to show movement.

Shutter priority mode is most useful where you want to convey movement.

Look at the images below …..

Do you think the propellers look more natural?

High shutter speeds are generally desirable BUT in certain circumstances you need a slower speed to correctly convey the scene

For propeller aircraft you should convey the turning movement of the props. It is a far more realistic look and will give your aircraft photos increased realism.

To achieve a realistic looking propeller blur, you should choose a shutter speed of around 1/250th of a second or lower.

You will find a bit of trial and error with shutter speeds is necessary to establish a realistic look to the propellers.

  • slower shutter speed = more blur
  • higher shutter speed = less blur.

Also bear in mind that different aircraft types have different propeller rotation speeds. You will need to choose different shutter speeds to convey a particular ‘look’ depending on the aircraft type.

Helicopters can be a real challenge as the rotors turn much slower. You should select a maximum shutter speed of around 1/160th of a second to capture a realistic rotor blur.

With such low shutter speeds you will need to use good camera handling technique.  Good camera handling technique will help reduce camera shake when using low shutter speeds.

Part 4 of the series will look in depth will look at camera handling.

There has been some pretty heavy stuff in this series of posts. Take time to read and understand the discussions. When you put the theory into practice you should see an improvement in your aircraft photography.

A quick summary then

  • aim for shutter speeds of 1/1000th of a second to reduce the risk of blur through camera shake
  • convey movement by using shutter priority mode to select a lower shutter speed
  • a high shutter speed results in stationary propellers – not a good look
  • lower shutter speed brings a greater sense of movement
  • lower shutter speeds increase the risk of camera shake

In part 4, I will discuss some techniques to overcome some of the more demanding aspects of aircraft photography.

I will look at good camera handling technique including –

  • holding your camera and lens
  • your stance and posture
  • how body movement can affect the end photo.

I will also look at some advanced camera and lens features to further help and improve your aircraft photography.

Thanks for reading this post and I hope you have found something of use. I would love to hear your comments and feedback on the content above. It would be great to see any images you get using the techniques discussed in this post.

If you want to discuss any of the details in more depth then don’t hesitate to give me a shout

Cheers

Gary

GDMK Images News

Posted on 2 Comments

Aircraft Photography Tips Part 2 – Camera Metering Modes, Exposure Modes And Exposure Compensation

Belgian Air Force F-16 aeroplane trailing white vapour trails during an airshow display

Aircraft Photography Tips – Choosing Camera Metering Modes, Exposure Modes And Exposure Compensation

In my first post on aircraft photography, called aircraft photography tips part 1, I discussed essential camera modes and looked at some of the currently available lenses.

Specifically, I mentioned the importance of control over certain camera modes of your chosen camera.

Those camera modes were –

  • metering mode – centre weighted and spot
  • manual control of exposure compensation
  • auto modes – aperture priority and shutter priority

Lets look at these camera modes to understand how and why they affect the finished image.

The article will talk in depth about the technical aspects of camera exposure. My aim is to make the article interesting enough for those with some knowledge of the subject without being too complex for beginners. Please let me know if I was successful in this approach!

Camera Metering Modes

One of the most important factors in any type of photography is to understand and interpret the varying light levels in your chosen scene. The photographer then needs to understand how the selected metering mode will affect the camera in achieving the final exposure.

In general photography, the majority of scenes will consist of evenly lit subjects.

Multi area matrix metering, which evaluates the relative brightness of subjects in the whole scene, is usually very good at selecting an exposure that will render the colours and brightness levels in a very authentic manner.

I am sure we have all experienced scenes that have more sky or shadow and see that the resultant image has either nice shadow detail and a burnt out sky or a nice sky and dark shadows.

This is because the matrix metering is trying to evaluate an unevenly lit scene. Whichever element, bright sky or dark shadows, forms the majority of the scene will be judged to be the most important and the camera exposes accordingly.

It is extremely important to remember that aircraft in the air are comparatively small and dark against a big bright (hopefully blue!) background.

If you choose wide area matrix metering modes you are going to quickly run into underexposed shots.

With multi area matrix metering, the camera sees a large bright expanse of sky dominating the scene and exposes for an overall bright image. Typically you will get a nice blue sky and a black or dark grey aircraft.

Because the aircraft are relatively small compared to the whole scene, you must compensate against this by selecting centre weighted or spot metering mode.

These two camera modes reduce the amount of the overall scene that the camera measures when computing exposure.

Centre Weighted Metering

Centre weighted metering simply means that the exposure calculations made by the camera put more emphasis on the readings detected in the centre of the image.

Typically, centre weighted metering will put the emphasis on about 8-15% of the scene. The brightness levels of the whole scene are still evaluated, but the camera adjusts the exposure so that the readings taken from that 8-15% are given the greatest emphasis in its calculations.

One thing to remember is that each brand implements their metering modes slightly differently, and the sophistication of weighting calculations vary as well.

Lower end models may have a fixed value of emphasis and have the centre weighting fixed to the centre of the focusing area.

With the more expensive cameras in any given range, you will find the sophistication of the systems increase.

You will find that you can control the size of the centre weighting in steps somewhere between 8-15% and that this weighting is not fixed but follows the selected focusing point.

Spot Metering

Spot metering is simply a more extreme version of centre weighted metering. The emphasis is now placed on an area as low as 1 or 2% of the scene. Again, each brand implements the feature slightly differently and the sophistication increases as you move higher into the brand range.

Spot metering is a key feature and is not always included in the lower end models so make sure any model of camera you look at has spot metering.

It is extremely important to remember that aircraft in the air are comparatively small and dark against a big bright (hopefully blue!) background

So, by understanding how cameras evaluate a scene, and how the user can select a weighting mode, you should be able to see how a more accurate exposure of our aircraft against a bright sky can be achieved.

Although cameras metering modes are becoming extremely sophisticated and competent, they are still not fool-proof in getting that well-exposed aircraft photo.

This is where the next important camera feature – exposure compensation, comes in to help.

Exposure Compensation

So far we have looked at how we can choose a metering mode that will help the camera to interpret the scene as we want it to.

Exposure compensation allows you to directly adjust the calculated exposure value by a set amount of either over or under exposure.

By manually controlling exposure compensation, you are further controlling the final calculated exposure.

Most modern DSLR cameras allow you to manually ‘dial-in’ a fixed adjustment to the calculated exposure value.

Depending on your camera, you can usually add in between +2 and -2 stops of exposure in steps of either 1/3 or 1/2 stop increments.

I like to dial in up to +0.7 exposure for small aircraft and +0.3 exposure for larger aircraft, but you will find that the exact compensation is a matter of trial and error depending on the light encountered on the day.

I do this because a smaller aircraft means more bright sky affecting the calculation so I want the camera to overexpose slightly more on its calculation. A larger aircraft means less bright sky so the camera is more likely to calculate a more pleasing exposure so only a small adjustment is needed.

Don’t be afraid to take test images – review the histogram and fine tune your adjustments. As the light changes during the day, you will probably need to make adjustments anyway.

In the example below, a single F-16 trails vapour at an airshow. The camera sees a large tract of bright blue sky as the dominant feature in the scene.

By selecting either spot or centre-weighted metering, adding exposure compensation and framing your target aircraft in the area of emphasis, you can increase the chances of a good exposure.

In this example I had +0.3 dialled in and used spot metering exposure mode.

Lets look at the next features – aperture priority and shutter priority modes

Auto Exposure Modes – Aperture Priority and Shutter Priority

We use the camera as a tool to calculate that ‘x’ amount of light needs to get to the sensor to produce a ‘good exposure’.

The previous section looked at how we help the camera calculate a good exposure, now its time to look at how the camera executes that exposure.

Camera exposure basics

Exposure is controlling the amount of light hitting the camera sensor.

In basic terms, every lens has an adjustable opening, called its aperture, that controls how much light entering the front of the lens is passed through to the sensor.

The shutter speed controls how long the sensor is exposed to the light coming through the lenses aperture.

The exposure calculation simply means the camera needs to let ‘x’ amount of light get to the sensor.

To get ‘x’ amount of light onto the sensor, the camera selects an appropriate combination of aperture and shutter speed.

In pure ‘auto’ or commonly ‘P’ mode, the camera will select both values and operate the shutter.

Essentially, Aperture Priority and Shutter Priority are still camera ‘auto’ modes, but importantly execute that exposure based on the user choosing to directly control either the aperture value or shutter speed.

By using Aperture Priority or Shutter Priority modes, we are taking more direct control on how the camera is generating the image.

So what does that all this mean in simpler terms?

Differences between Shutter Priority and Aperture Priority camera modes

In shutter priority mode, the user can select an exact shutter speed and the camera will choose an appropriate aperture to ensure the exposure corresponds to our ‘x’ amount of light.

Conversely in aperture priority mode, the user selects an aperture and the camera will calculate the appropriate shutter speed for our ‘x’ amount of light.

So, if aperture priority and shutter priority both do a similar thing, why bother differentiating between them – why not just use whatever mode you are comfortable with?

Unfortunately, it isn’t that simple if you want the best results. You will find to get the best photos, you will be regularly swapping between both modes depending on the type of aircraft, lighting conditions and mood you want to create.

So, if aperture priority and shutter priority both do a similar thing, why bother differentiating between them – why not just use whatever mode you are comfortable with? Unfortunately it isn’t that simple if you want the best results.

Benefits of Aperture Priority mode

Lets look at a couple of environmental issues you will likely face when out and about –

  • you are using a telephoto (and probably heavy) lens
  • your subject could be moving extremely fast (military jets) or painfully slow (older prop aircraft)
  • the wind is probably going to be blowing you about
  • the lens hood will be acting as a sail increasing the effects of any wind

Very quickly you are going to run into the problem of camera shake and blurred images. The aim is sharp images so you want the fastest shutter speed obtainable.

In aperture priority mode, you can select an aperture of f2.8 or f4 (on more expensive lenses), f5.6 ( most common on cheaper telephotos), f8, f11, f16, f22 and maybe f32.

You choose an aperture and the camera automatically chooses an appropriate shutter speed to give a good exposure. That amounts to 7 options (slightly more if including intermediate apertures between each major ‘stop’).

The aperture options for you to select are restricted to the physical quality and abilities of the lens.

Hidden dangers of Shutter Priority Mode

In shutter priority mode, you can select a shutter speed anywhere from 30 seconds through to 1/4000th of a second. That is a lot of options.

This is where you need to be really careful and understand the concepts of exposure.

Starting with aperture priority, let’s consider an average bright day with ISO set to 200.

The table below shows examples of typical shutter speeds your camera will generate for a given aperture.

  • f5.6   1/1600
  • f8       1/800
  • f11     1/400
  • f16     1/200
  • f22    1/100

From this you can see the suitable shutter speeds for good exposure range from 1/1600th to 1/100th of a second.

Herein lies a trap for the unwary.

In shutter priority mode, you can select any shutter speed you want. If you choose a faster shutter speed, the camera will need to select a wider aperture to let more light in. If the lens doesn’t support a wide enough aperture to allow enough light in for a balanced exposure, you will get an underexposed image.

Conversely, you can select a 1 second exposure, but if the lens doesn’t have a small enough aperture to automatically restrict the light sufficiently you will create an overexposed image.

If you are using shutter priority mode, you need to be conscious of this. In the heat of the action, you might want to get a faster shutter speed and not realise you are already at the limit of the available apertures.

How I use shutter priority and aperture priority camera modes

To manage shutter speeds I use aperture priority mode to obtain the fastest possible shutter speed while safely staying within acceptable exposure values.

I do this because, in aperture priority mode, once you get to the widest aperture, you cannot make any further adjustments. The camera will have selected the fastest possible shutter speed for that aperture and ISO setting.

This is why you should use aperture priority mode to select your fastest possible shutter speed.

Herein lies a trap for the unwary. You can select a faster shutter speed, but because the lens doesn’t support a wide enough aperture to allow enough light in for a balanced exposure, you will get an underexposed image.

When starting out in aviation photography, you want to aim for 1/1000th of a second shutter speed as a minimum – if you see lower speeds than say 1/320th, you really need consider turning up your ISO setting.

If you find you are still seeing lower shutter speeds and are approaching ISO 640 or higher, you need to see part 4 where I will discuss some techniques to help you through this problem.

There is an awful lot more to choosing appropriate apertures, shutter speeds and photographing aircraft, but the above lays out the basics for those starting out in aviation photography. If followed, with a little practice, you should be on the road to getting some acceptable images. Once you are getting a good hit rate using these basics you can look into some of the more advanced techniques and aspects of aviation photography in the upcoming parts 3 and 4 of my series.

So in summary

  • use either centre or spot metering modes to reduce the effects of a bright background on your subject
  • use exposure compensation to further control exposure
  • use aperture priority mode to get the fastest shutter speed whilst staying within a band of appropriate exposure values
  • beware of incorrect exposure by relying on shutter priority mode

By now you might be asking why bother mentioning shutter priority mode at all – why not stop in aperture priority mode?

Check Aircraft Photography Tips Part 3 to see the answer.

That’s all for now folks, thanks for reading and I hope you have learnt something useful from this article. Please don’t be afraid to leave your own tips or question on what I have discussed above.

Gary

GDMK Images News

Posted on Leave a comment

Aircraft Photography Tips Part 1 – Choosing Cameras And Lenses

RAF 3 Squadron 100th Anniversary colour scheme Eurofighter Typhoon landing at RAF Coningsby

Aircraft Photography Tips Part 1 – Cameras And Lenses

This post on aircraft photography has been refreshed and updated in June 2016 to take account of the latest lens releases.

Aircraft photography can present a number of issues which can catch out the casual photographer.  My updated article shares a few tips with you on how I approach photographing aeroplanes. I have listed the main factors this aircraft photography series will look at below –

  • cameras
  • lenses
  • appropriate camera modes
  • general camera technique.

Camera Specs

For aircraft photography, you ideally want an SLR camera that allows the user to select both spot and centre weighted metering modes. Choosing a camera with the ability to switch between these metering modes will make consistently reliable exposures a lot easier to obtain. It is important to note that not all entry level cameras will have a spot metering mode so make sure you check the specs out on any camera you are looking to buy.

Your chosen camera will also need shutter priority and aperture priority exposure modes.

Finally, check the camera has manual control of exposure compensation.

Some compact cameras and bridge cameras look appealing because they feature long reach lenses. Check the specs to make sure any bridge or compact camera has the features and modes mentioned above. The ability to mix and match metering and exposure modes is more valuable than lens reach.

Shutter Lag

If you have, or choose to buy, a compact or bridge camera then pay close attention to the cameras shutter lag specification. Shutter lag is the amount of time between you pressing the shutter button and the shutter operating. This time difference is referred to as shutter lag and ideally needs to be as close to zero as possible. I guarantee there is nothing more frustrating than to frame perfectly your subject matter but miss the shot because of shutter lag.

I use a Sony Nex-6 for general walking about or if travelling light, and many times shutter lag has caught me out because I am used to the instant response of my Nikon DSLR. So shutter lag can be a real problem photographing planes.

If using a compact or bridge camera be sure to look at the cameras shutter lag specification. There’s nothing more frustrating than to frame your image perfectly then miss the shot because of shutter lag.

Whatever camera system you have, or choose to buy, to consistently get good aircraft photo’s you will need to get intimately familiar with the following camera features

  • aperture and shutter priority modes
  • exposure compensation controls
  • metering modes – matrix, centre weighted and spot.

Don’t worry, these camera modes and features are discussed in depth in part 2 – Aviation Photography Tips – Metering Modes, Exposure Compensation and Exposure Modes.

These terms might seem a bit daunting at first – you will need to practice and experiment to really understand the subtle differences of each function, but your persistence will be rewarded.

Having a good understanding of what these camera modes do, in which circumstances to use them, and how to quickly change between them is very important.

To get consistently good aircraft pictures you need to focus on the action unfolding in front of you and not get distracted by operating the camera.

you will need to practice and experiment to really understand the subtle differences of each function, but your persistence will be rewarded.

Which Camera For Aviation Photography?

The choice of cameras available are overwhelming, but almost any of the current crop of DSLRs are capable of delivering good results, providing they feature the modes and features mentioned above.

I suggest a DX or crop factor camera will be of more benefit than a full frame camera. The ‘crop effect’ of the smaller sensor gives you a ‘free’ boost to your zoom lens of up to 1.5x magnification.

Try not to get caught by GAS – Gear Acquisition Syndrome. Buying the newest, latest and greatest lens, camera or whatever is absolutely no guarantee of success.

Having a solid understanding of your camera and lens performance and then applying that knowledge to your subject matter is the real key to success.

Lenses

The lens you invest in will depend on many factors not just how deep your pocket is.

The first question you need to ask yourself is what type of aviation photography do you want to undertake. If you are looking at capturing larger and slower moving commercial aircraft at your local airport, the lens choice could be a lot different to getting fast moving fighter aircraft at airshows or low level in the Mach Loop.

As silly as it sounds, if you are looking at the civil aviation scene, any lens between 24mm or 28mm through to 300mm will have its uses.

If smaller warbirds or modern fighter aircraft are more your thing then a telephoto lens with a reach of at least 300mm is a good starting point.

Its pretty straight forward deciding on exactly what lens range you want – the smaller your target the longer reach you need from your lens and vice versa.

I used to use a Sigma 100-300mm EX f4 lens sometimes combined with the Sigma 1.4x teleconvertor. This combination gave 460mm reach which equates to 640mm when factoring in the crop factor of a Nikon DX format camera. This combination has served me well and has yielded good results. It didnt have image stabilisation (IS) or vibration reduction (VR) but is a solid lens giving good results.

I sold, and am still selling, many aircraft pictures used with that lens combo.

What lenses might be considered suitable for aviation photography?

Generally speaking, speed of focus and image sharpness at the long end of the zoom range are the most important factors in choosing a lens for aircraft photography. At the end of the day there is no point in having 300mm or more of lens reach yet the autofocus cant keep up with a fast moving jet. Conversely, lightning fast focus is no use if the image is that soft that it might as well be out of focus!]

Entrance Level Zoom Lenses

As with everything in life, focus speed and image sharpness generally improve in proportion to the price tag.

Starting with the cheaper options, Nikon offers a reasonably cheap Nikkor AF-S DX VR 55-300mm f/4.5-5.6G ED VR which could be used as a first lens. Reviews suggest the lens isnt particularly fast focussing and the image sharpness drops noticeably between 200mm and 300mm.

Moving up a bit in quality and performance is the new Nikkor AF-S VR 70-300mm f/4.5-5.6G IF-ED which is supposed to be very good and offers better VR and features better quality lens glass.

Sigma offer the 70-300mm f/4-5.6 DG OS and Tamron offer the SP 70-300mm f/4-5.6 Di VC USD.

All three lenses are reasonable performing mid range zoom lenses and wont cost a fortune.

More importantly, if you decide aircraft photography is not your thing, you wont be greatly out of pocket and will have a good lens that is perfectly suitable for many other styles of photography.

Intermediate Range Zoom Lenses

As you move further up the quality and price range you will come across the new Nikkor AF VR 80-400mm f/4.5-5.6D ED which features improved optical quality, auto focus performance and VR.

The traditional alternatives, and until recently the aviation photographers lenses of choice, are the Sigma 50-500mm f4-6.3 APO DG OS HSM and Sigma 150-500mm f/5-6.3 DG OS HSM APO. Both lenses are well respected for aviation photography and the debate still rages as to which lens is the better. In simple terms both are very good lenses, especially if you can get one second hand. Reports seem to suggest the Sigma 150-500mm lens is slightly better than the Sigma 50-500mm. The former is also cheaper but both lenses get good reviews.

Reports seem to suggest the Sigma 150-500mm lens is slightly better than the Sigma 50-500mm. The former is also cheaper and both lenses get good reviews.

Next up is the Sigma 120-300mm f2.8 APO EX DG OS HSM which is very well respected amongst wildlife photographers as well as aviation photographers but comes with an even bigger price tag.

In a similar price range is the Canon 100-400mm L f4.5-f5.6 which is coveted by Canon photographers. As a Nikon user I cannot comment either way, but reviews and discussions around the web indicate this is a very good lens for Canon owners.

As mentioned earlier, the two Sigma lenses were the defacto lenses of choice for aviation photography until very recently.

Tamron, and more recently Sigma, shook up the market with new lens offerings. Both companies have released a 150-600mm zoom lens with exceptional image quality. Sigma even released two versions – one in their C or Contemporary range and one in the S or Sport range. The S version has better optics and is aimed squarely at sports photographers and has a price to match. The Tamron and Sigma C lenses are priced similarly to the 150-500mm and 50-500m lenses which seems to indicate that they will take over the mantle of ‘go to’ lenses for aviation photographers.

These three lenses get rave reviews and seem to have significantly raised the bar in terms of affordability versus optical quality and image sharpness.

More recently Nikon released their 200-500mm f5.6 VR lens. This is similar in price to the Tamron 150-600mm and the Sigma 150-600 C lenses. The Nikon has a slight edge in that it features a constant f5.6 aperture throughout the zoom range. As a negative it only goes to a maximum zoom of 500mm.

For what it is worth, I tried both Sigma 150-600’s and the 200-500 side by side on a Nikon D7200 and ended up buying the Nikon 200-500 lens.

The Nikon just seemed to focus faster and the VR seemed smoother in operation and looked steadier. It was purely a subjective test but I went with my gut feeling when making a decision.

It should be noted that once you start looking beyond the three 70-300mm zoom lenses I mentioned, you are looking at very good lenses that are going to set you back a decent sum of money. They shouldnt be viewed as casual purchases and are only suitable if you want to seriously get into aircraft photography.

One saving grace is that many are upgrading from their 50-500’s and 150-500’s so there is a chance of picking up one of these proven performers second hand at good prices.

A factor you may overlook in your lens choice is the weight. A standard 70-300mm lens will weigh somewhere around the 750g to 1kg mark. The 150-600mm lenses are going to weigh in between 2 and 2.5kg. You are going to notice the weight after an hour or so at an airshow!

Superzoom Lenses

I purposely havent included any of the superzooms in the 18-200mm or 300mm range. This is primarily because there is a lot going on inside a wide angle superzoom lens and many optical compromises are made to fit all that zoom range into a single lens. There is a place for the superzooms in photography, and I have considered getting one, but not for aviation photography.

I do feel that if you are seriously looking at aviation photography and are tempted by the superzooms then you will be better served by separate lenses.  A good 70-300mm for flying aircraft and a wide angle lens for aircraft on the ground will serve you better as opposed to a single superzoom lens.

You can get very close to the action at some airports, so a wider angle view lens can result in some interesting alternatives to the standard 3/4 front landing type image. Indeed, you may find the shorter end of a 150-500 or 600 lens isnt short enough and end up missing shots!

Long Prime Lenses

I purposely havent discussed the various prime lenses such as the 400mm, 500mm or 600mm lenses purely for the reason that they are out of the budget range of many photographers. Needless to say, they are generally exceptional lenses but come with eye watering price tags well out of reach of the average photographer.

I havent discussed the various prime lenses such as the 300mm, 400mm or 500mm purely for the reason that they are out of the budget range of many photographers

There are many differing opinions on lenses so please feel free to comment or get in touch if you want to discuss these lens options and their relevant pros and cons in more depth.

So in summary, I have suggested a camera system that allows the user to select and control the following

  • metering mode – centre weighted and spot
  • auto modes – aperture priority and shutter priority
  • manual control of exposure compensation.

I also suggested a telephoto zoom lens with a reach of around 300mm. Next time we will look in more depth at the camera exposure and metering modes mentioned above.

I hope you have found the post interesting so far, follow the link to read Aircraft Photography Tips Part 2 – Camera Metering Modes, Exposure Modes And Exposure Compensation

Thanks for reading

Gary

GDMK Images News