Aircraft Photography Tips Part 3 – Why Use Shutter Priority Mode?

Why Use Shutter Priority Mode in aviation photography?
Here is the third instalment in my aircraft photography tips series. If you have missed the first 2 parts then follow the links below to catch up.
Aircraft photography tips part 1 looked at cameras and lenses
Aircraft photography tips part 2 looked at camera modes and discussed exposure basics
Part 2 finished with a bit of a conundrum. Does shutter priority mode have a use for aircraft photography? Well, worry not, all will be explained below.
So far we have looked at how to maximise the shutter speed to avoid blurred images caused by camera shake. A higher shutter speed in theory brings with it a sharper image and reduces the effects of camera shake. Beginners in aviation photography should be aiming for around 1/1000th of a second to minimise the chances of blur through camera shake.
I am now going to turn everything we have discussed on its head. In some cases a lower shutter speed is necessary. I will show in certain circumstances you should limit the shutter speed to a maximum of 1/250th of a second. It seems a little strange to now be discussing the use of slower shutter speeds – why?
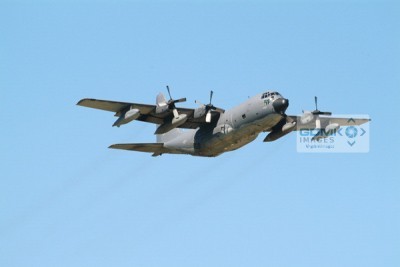
Look at the image below and you will soon see why……..

Can you see the problem?
The high shutter speed has frozen the movement of the propellers. This creates the impression the C130 Hercules aircraft is hanging in the sky.
This is not a good look and exactly why shutter priority mode should be used.
High shutter speeds are generally desirable BUT in certain situations you should choose a slower speed to realistically convey the scene.
I suggest you restrict shutter priority mode in aviation photography to when your subject is a propeller powered aircraft or when you want to show movement.
Shutter priority mode is most useful where you want to convey movement.
Look at the images below …..


Do you think the propellers look more natural?
High shutter speeds are generally desirable BUT in certain circumstances you need a slower speed to correctly convey the scene
For propeller aircraft you should convey the turning movement of the props. It is a far more realistic look and will give your aircraft photos increased realism.
To achieve a realistic looking propeller blur, you should choose a shutter speed of around 1/250th of a second or lower.
You will find a bit of trial and error with shutter speeds is necessary to establish a realistic look to the propellers.
- slower shutter speed = more blur
- higher shutter speed = less blur.
Also bear in mind that different aircraft types have different propeller rotation speeds. You will need to choose different shutter speeds to convey a particular ‘look’ depending on the aircraft type.
Helicopters can be a real challenge as the rotors turn much slower. You should select a maximum shutter speed of around 1/160th of a second to capture a realistic rotor blur.
With such low shutter speeds you will need to use good camera handling technique. Good camera handling technique will help reduce camera shake when using low shutter speeds.
Part 4 of the series will look in depth will look at camera handling.
There has been some pretty heavy stuff in this series of posts. Take time to read and understand the discussions. When you put the theory into practice you should see an improvement in your aircraft photography.
A quick summary then
- aim for shutter speeds of 1/1000th of a second to reduce the risk of blur through camera shake
- convey movement by using shutter priority mode to select a lower shutter speed
- a high shutter speed results in stationary propellers – not a good look
- lower shutter speed brings a greater sense of movement
- lower shutter speeds increase the risk of camera shake
In part 4, I will discuss some techniques to overcome some of the more demanding aspects of aircraft photography.
I will look at good camera handling technique including –
- holding your camera and lens
- your stance and posture
- how body movement can affect the end photo.
I will also look at some advanced camera and lens features to further help and improve your aircraft photography.
Thanks for reading this post and I hope you have found something of use. I would love to hear your comments and feedback on the content above. It would be great to see any images you get using the techniques discussed in this post.
If you want to discuss any of the details in more depth then don’t hesitate to give me a shout
Cheers
Gary


