Posted on Leave a comment

Choosing Camera Kit for an Epic Trip Made Easy

Lowepro Mini Trekker Camera Bag

[vc_row][vc_column][vc_column_text]

Ted on Tour USA – Choosing Camera Kit for an Epic Trip

Choosing Camera Kit for an Epic Trip is the first part of a new blog post series. This series will run parallel to our travel blog posts documenting our epic trip across America. This new series will feature the photographic related aspects of the 15000 mile trip.

In this first post I will discuss the process I used to choose what camera kit to pack for our 6 week Ted on Tour USA trip. I will also be providing background information and tips to some of the pictures taken on the first part of our trip from the UK to New York

Here are links to read an overview of the Ted on Tour USA trip and Ted on Tour USA Part 2 Gatwick to New York.

Alternatively check out the timelapse video below![/vc_column_text][vc_video link=”https://youtu.be/LJzK-LAxT-U” align=”center” title=”Ted on Tour USA Video”][/vc_column][/vc_row][vc_row][vc_column][vc_column_text]
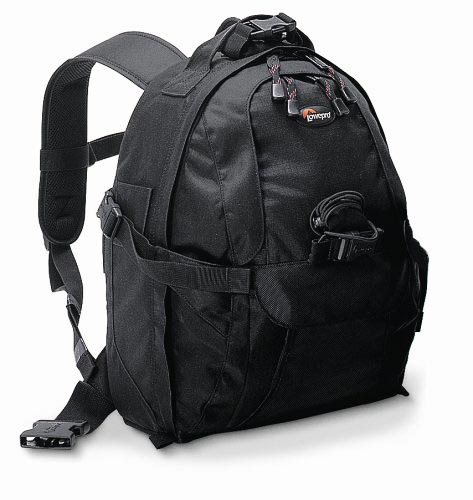
Which Camera Bag?

Our Norwegian Airlines flight allowed us to check in one 20kg bag each and take one carry on bag each. We chose to use a Lowepro camera bags as our carry on bags. This ensured all the delicate camera kit would be kept with us and away from the dreaded baggage carousel system.

I have several camera bags and chose the following for this trip –

  • Lowepro Mini Trekker AW which is capable of holding an SLR Camera with a large telephoto lens attached and 4 or 5 other lenses
  • Lowepro Fastpack 350 which holds an SLR Camera with a small zoom and 3 to 4 other lens.
  • Lowepro Event Messenger 250 shoulder bag. Ideal for a camera and a couple of lenses and a laptop.

I chose the Mini Trekker because it can carry a ton of camera kit and will (just) hold my camera with Nikon 200-500 attached. I use this camera bag 90% of the time.

The Fastpack camera bag is great as it has a top compartment ideal for carrying a wide array of items. You can use it to hold all your leads and chargers or alternatively put a bit of lunch and some other bits in there. The Fastpack camera bag has a slide-in opening for a laptop and/or notepad tablets.

The Event Messenger is a great shoulder bag that is ideal for when travelling light. It also has a slot for laptops (up to 15″ screens) and notepad tablets. The Event Messenger camera bag would travel empty and flattened in our checked in luggage. This camera bag would be ideal for travelling light when we got to ‘the other side’ and I didnt necessarily want to carry all the gear around.

Prior to the trip I did seriously look at buying a roller bag along the lines of a Think Tank Airport or similar. I eventually decided against buying one as I wasnt absolutely sure the roller bag would be better than a backpack when transferring between trains and planes etc.

I have undertaken many trips and found the backpacks perfectly when dragging suitcases around. I didnt want to risk my first experience with a roller camera bag on such a big trip.[/vc_column_text][ess_grid alias=”choosing-camera-kit-camera-bags”][/vc_column][/vc_row][vc_row][vc_column][vc_column_text]

Choosing Camera Kit

When I am choosing camera kit to take on any trip, I always start by listing where I want to go and what sort of shots I want to get. I have many lenses ranging from 15mm through to 500mm so needed to work out which lenses to leave at home without compromising my flexibility.

Create a Shot list

From part 1 of planning an epic trip here is my brief shot list

  • City scenes
  • Railways
  • Aircraft
  • Abandoned buildings and vehicles, dereliction and abandonment

Mixed into this would be the obligatory general touristy type shots of wherever we went.

In order to select appropriate lenses I padded out the brief list above with some specific details[/vc_column_text][/vc_column][/vc_row][vc_row][vc_column width=”1/3″][vc_column_text]

New York

  • buildings
  • water towers
  • escape ladders
  • city skyline
  • shots from tall buildings
  • street scenes

[/vc_column_text][/vc_column][vc_column width=”1/3″][vc_column_text]

San Francisco

  • Golden Gate Bridge
  • trolly buses/cable cars
  • Alcatraz buildings

[/vc_column_text][/vc_column][vc_column width=”1/3″][vc_column_text]

Pacific Coast Highway

  • general vista’s
  • national parks

[/vc_column_text][/vc_column][/vc_row][vc_row][vc_column width=”1/3″][vc_column_text]

Route 66

  • old buildings
  • old cars
  • abandoned living

[/vc_column_text][/vc_column][vc_column width=”1/3″][vc_column_text]

Aircraft

  • Vegas Nellis AFB
  • Las Vegas McCarren Airport
  • Fort Lauderdale Airport
  • Joe Davis Airpark in Palmdale

[/vc_column_text][/vc_column][vc_column width=”1/3″][vc_column_text]

Railways

  • Around New York
  • California Zephyr
  • Tehachapi Loop

[/vc_column_text][/vc_column][/vc_row][vc_row][vc_column][vc_column_text]Putting more details into our shot list made it easier to break down the lens characteristics I would need

  • Aircraft pics would need long reach
  • Street photography would need flexibility in zoom length
  • National Parks I thought would need wide and low light capable
  • Aircraft museums would need wide view and low light capable

I always want to take all my camera kit on every trip but it simply wasnt practical on this trip. With this in mind I sort through all my kit and remove things I can justify leaving at home. I couldn’t foresee having the time to mess with flash or macro so it was easy to discount all my flash kit and macro lenses.

Working through the considerations I felt these lenses made sense

  • Nikon 200-500 f5.6 for airbases and airports
  • Sigma 18-200 C, Nikon 16-85 and Sigma 18-35 f1.8 A for Street photography
  • Nikon 50mm f1.8 because its so light I take it everywhere!

This lens selection would provide a lot of flexibility and cover pretty much every scenario encountered.

Cameras

Choosing cameras is always a lot easier – I always take all 3 cameras!

  • Nikon D7200
  • Nikon D300
  • Sony NEX6 with 16-50 lens

I usually keep the Nikon 16-85 on my D300 for general shots. I then use my Nikon D7200 with whatever specialist lens capability I want.

The Sony NEX6 is great for general pictures plus video. Its so small and light yet the picture quality is fantastic.

Camera Accessories

I also threw (metaphorically) these filters and accessories into the bags –

  • Hoya Pro 1 circular polariser filter for 16-85 and 18-200 due to potential haze and glare on the Pacific Coast highway and in the desert
  • A selection of different rated neutral density filters for creative work
  • Manfrotto 055 tripod
  • Manfrotto Ball head 057 Magnesium Ball Head with Q5 Quick Release
  • Manfrotto 035 Universal Super Clamp
  • Memory cards – as many as I could get into my bags
  • Laptop
  • Spare batteries
  • Chargers for everything

Apart from the cameras, lenses, laptop and notebook tablets, everything else would go in the suitcases. The camera bags would be heavy enough, so all of the robust non essential stuff would go into the suitcase.[/vc_column_text][/vc_column][/vc_row][vc_row][vc_column][vc_column_text]I have to make special mention of the Manfrotto Universal Super Clamp. This single piece of kit is simply amazing! Combine it with the ball head and you have a really useful tool for when a tripod either isnt allowed or there isnt sufficient space. It can be a bit unwieldly, but the flexibility if you can find a mounting point, is fantastic.

The jaws open wide and it clamps to pipes, railings, poles – pretty much anything. With the ball head fitted you can move your camera around irrespective of the fixings orientation. You do need to ensure there is a reasonable amount of clearance around your fixing point to allow your head and camera to be moved. It’s fantastic though and has made many long exposure shots possible that I would otherwise have missed or at least struggled to get.[/vc_column_text][ess_grid alias=”manfrotto-super-clamp”][vc_column_text]

Camera Kit Complete

So after working through my shot list I had finally decided on what camera kit to take.

  • Nikon 200-500 f5.6 for airbases and airports
  • Sigma 18-200 C, Nikon 16-85 and Sigma 18-35 f1.8 A for Street photography
  • Nikon 50mm f1.8 because its so light I take it everywhere!
  • Nikon D7200
  • Nikon D300
  • Sony NEX6 with 16-50 lens
  • Hoya Pro 1 circular polariser filters
  • A selection of different rated neutral density filters
  • Manfrotto 055 tripod
  • Manfrotto Ball head 057 Magnesium Ball Head with Q5 Quick Release
  • Manfrotto 035 Universal Super Clamp

[/vc_column_text][/vc_column][/vc_row][vc_row][vc_column][vc_column_text]

Creativity and Improvisation

I’m always on the lookout for unusual shots and angles from the moment I leave the door. I knew the low level Thameslink platforms would provide a nice low light opportunity. I like long exposures and low light photography so was interested in the potential for blurred motion pictures of the trains arriving and departing. The long exposures are also great for getting people to show up as shadowy characters as they walk along the platforms.

I used the suitcases as a stable rest and the cameras built in timer in place of a tripod and release cable to get some pictures of the trains arriving and departing. Just because my tripod was packed in the suitcases didnt mean I wasnt going to take some long exposure photos. I moved the cases around to suitable places on the platform and took a number of long exposures. If you dont have anything with you put your camera on the floor, or on seats, bins – anything that is stable will do! Be creative and use the things to hand! Just be sensible – dont use improvised items right at the edge of platforms or block entrances and exits, you know the score!

I had hoped to get some aircraft photos whilst at Gatwick but the views were useless. I didn’t bother getting any photos in the departures lounge and surrounding area as basically there wasn’t a lot of scenes that caught my interest. I just didnt feel the ‘vibe’ and didnt feel the effort worth risking the attention from the heavy security presence for the meagre pickings on offer.

Shooting From on High

In part 2 – Gatwick to New York I mentioned we used the open top Big Bus tours to get around New York. These open top buses were great for orientating ourselves in a new city. From a photographers point of view they are great for several reasons –

  • The tour guides provide a great insight and point things out you would likely miss if unescorted
  • you see things you may not see from the ground
  • the elevated position gives you a different view of your chosen subject
  • people are unaware of your presence so there are great candid picture opportunities

Unfortunately there are a few downsides to the Big Bus tour buses for photographers –

  • an obvious lack of opportunity to ‘work’ a scene from different viewpoints
  • your fixed viewpoint means you almost always need a superzoom
  • other passengers on the bus getting in the way!

One additional bonus I didn’t anticipate with Big Bus tour was on the rainy days. I got some great abstract pictures of rainstreaked windows combined with the array of city lights. We also got to see the city and keep dry!

The Manfrotto Super Clamp would also come into its own for the views from high rise buildings. Tripods are a definite no no in most high rise buildings and, in reality, the volume of people around you makes them almost impossible to use. Most of the places we visited had some sort of railing or fixing I could use to stabilise the camera. As said before, the Super Clamp is a great piece of kit. In a couple of places I noticed the security guys watching me use the clamp. I could almost hear them wanting to scream ‘Excuse me Sir, you cant do that’ but obviously couldnt find an excuse to say it!

Below are examples from the scenarios discussed above.[/vc_column_text][ess_grid alias=”choosing-camera-kit-grid”][/vc_column][/vc_row][vc_row][vc_column][vc_column_text]

Part 2 – Long Exposure HDR

One technique I have been trying out is long exposure HDR. I wanted to try this technique out at New York Grand Central Station. This is an iconic location that has plenty of character and is perfect for standard HDR but has the added element of being very busy.

In part 2 I will show the results and discuss the techniques used.

Thanks for reading about how I chose which camera kit to take – I really hope you found it useful! Let us know your thoughts below

All the best for now and hope to see you in part 2!

Gary[/vc_column_text][/vc_column][/vc_row][vc_row][vc_column][vc_separator color=”sky” el_width=”80″][/vc_column][/vc_row][vc_row][vc_column][vc_column_text]

If you liked this article then why not share it with someone you know who will also find it interesting  …. thanks!

[juiz_sps buttons=”facebook,twitter, google, pinterest, digg, linkedin, stumbleupon, tumblr, reddit, mail, bookmark”][/vc_column_text][/vc_column][/vc_row][vc_row][vc_column][vc_column_text]

Related Posts …..

[/vc_column_text][ess_grid alias=”location-reports”][/vc_column][/vc_row]

Posted on Leave a comment

Building The Crescent Shopping Centre in Hinckley

The remodelled bus station in the new 'The Crescent' shopping centre in Hinckley

[vc_row][vc_column][vc_column_text]

The Crescent Shopping Centre in Hinckley

Hinckley finally has its brand new shopping centre. The concept of a rejuvenated bus station and shopping area, has been on the cards for Hinckley for a long, long time. Talk of a bus station redevelopment with a supermarket at its heart has been around since at least the mid 1990s.

I wanted to record the existing buildings, their demolition and the new building works. My decision to do this was partly as an attempt to ‘document’ a large scale project on my doorstep and also as a record for future generations.

At the end of the article are links to my Alamy lightbox of licensable pictures from this article. Following this is a review of the project from a photographers point of view. Here I discuss what I learnt and provide tips on how to go about planning your own similar project.

So here we go – a picture essay of the building of The Crescent shopping centre in Hinckley.

The development involves a piece of land bordered by Brunel Road, Rugby Road, Lancaster Road and Station Road.

Rugby Road Shops and Businesses

Below are the shops and businesses that existed along Rugby Road taken shortly after being fenced off.

Starting off we have the row of small units along Waterloo Road. The shop on the corner was Punctillios Model spot. I bought many an Airfix, Tamiya and other model kits in my distant youth. There was also a launderette, the old Wainfleet Bus booking office (long since closed) and a few others. I do remember there being one of the first computer shops in Hinckley here. Again many a mis-spent hour poring over the latest Spectrum game releases! Moving onto Rugby Road was the Catalogue Shop, which was the final incarnation of this building that had seen occupants as diverse as various bars and nightclubs through to a childs soft play centre.

The Sawasdee Thai restaurant was next to this followed by Bennetts Hosiery factory. The final affected building was ‘Hinckley Dry Cleaners’ that did nothing to hide its previous existence as a garage.[/vc_column_text][/vc_column][/vc_row][vc_row][vc_column][vc_masonry_media_grid style=”lazy” item=”9524″ grid_id=”vc_gid:1510601948069-03ee52ea-b503-10″ include=”9449,9456,9506,9450,9457,9455,9451,9453,9454,9452″][/vc_column][/vc_row][vc_row][vc_column][vc_column_text]

 Station Road Businesses

On the Corner of Lancaster Road and Station Road was Appleton House which was home to various accounting businesses. Moving along station road were a number of units that had mixed occupants. Unbelievably, I somehow managed to miss out the Volvo dealership on the corner of Station Road and Brunel Road. Not sure how that happened but there you go.[/vc_column_text][/vc_column][/vc_row][vc_row][vc_column][vc_masonry_media_grid style=”lazy” item=”9524″ grid_id=”vc_gid:1510601948080-4b33c990-978c-7″ include=”9448,9447,9446,9445″][/vc_column][/vc_row][vc_row][vc_column][vc_column_text]

 Brunel Road Businesses

The only businesses in Brunel Road were the Sainsburys and Iceland. These were located in the short stay carpark on the Right hand side of the road when looking down the hill.

The Volvo dealership ran down from the corner of Station Road and behind this was a gym and another couple of units. In front of these units was another short stay carpark and the bus station itself.

On the Left hand side of the road looking down the hill, was an old car repair centre, the St Johns Ambulance Building and a long stay car park. The garage sign is shown below where you can see the cleared concrete pad of the St Johns building directly behind with the long stay car park in the far distance.[/vc_column_text][/vc_column][/vc_row][vc_row][vc_column][vc_masonry_media_grid style=”lazy” item=”9524″ grid_id=”vc_gid:1510601948086-3b3b71a4-154e-7″ include=”9444,9443,9442,9441,9440″][/vc_column][/vc_row][vc_row][vc_column][vc_column_text]

 Clearance Work and Demolition

Here are several different views of the demolition and clearance works.[/vc_column_text][/vc_column][/vc_row][vc_row][vc_column][vc_masonry_media_grid style=”lazy” item=”9524″ grid_id=”vc_gid:1510601948091-ef9f3754-9fbd-5″ include=”9507,9501,9502,9462,9439,9503,9505,9461,9504,9512″][/vc_column][/vc_row][vc_row][vc_column][vc_column_text]

Views From Hinckley Bus Station

Looking towards Rugby Road from the road through the Bus Station.[/vc_column_text][/vc_column][/vc_row][vc_row][vc_column][vc_masonry_media_grid style=”lazy” item=”9524″ grid_id=”vc_gid:1510601948099-a6b8b60e-6966-3″ include=”9458,9459,9460″][/vc_column][/vc_row][vc_row][vc_column][vc_column_text]

The Crescents First Shoots Start to Show

Building work starts in earnest as the land is cleared of demolition debris. The first signs of the ironwork and superstructure are appearing.[/vc_column_text][/vc_column][/vc_row][vc_row][vc_column][vc_masonry_media_grid style=”lazy” item=”9524″ grid_id=”vc_gid:1510601948103-8060f618-248d-8″ include=”9469,9463,9464,9466,9467″][/vc_column][/vc_row][vc_row][vc_column][vc_column_text]

Construction Machinery and Vehicles

There was plenty of impressive hardware to see during the construction. I like my man-toys and gadgets and always find the machinery on show interesting.

Along with the usual diggers and dumpers, there were some impressive piling machines, drills and cranes. Always impressive to see when at work.[/vc_column_text][/vc_column][/vc_row][vc_row][vc_column][vc_masonry_media_grid style=”lazy” item=”9524″ grid_id=”vc_gid:1510601948107-cbfbfd73-aaaa-0″ include=”9475,9472,9468,9470,9431,9433″][/vc_column][/vc_row][vc_row][vc_column][vc_column_text]

New Buildings Familiar Sights

I always like to try and include something familiar in these type of transition shots. Including something old against the new build helps people to relate to familiar landmarks. Sometimes if the familiar is omitted it is hard to orientate where the photo is taken from and how it relates to the exisiting and known landscape. These photos help to prove Hinckley is still there in the background![/vc_column_text][/vc_column][/vc_row][vc_row][vc_column][vc_masonry_media_grid style=”lazy” item=”9524″ grid_id=”vc_gid:1510601948112-98aa56ca-fa3e-2″ include=”9471,9474,9432,9469,9483″][/vc_column][/vc_row][vc_row][vc_column][vc_column_text]

Construction Well Under Way

It doesn’t seem to take long for the superstructure and internal framework to take shape. Here are various views of the superstructure and ironwork.[/vc_column_text][/vc_column][/vc_row][vc_row][vc_column][vc_masonry_media_grid style=”lazy” item=”9524″ grid_id=”vc_gid:1510601948118-8b31e8fa-cd57-0″ include=”9482,9481,9479,9434,9478,9477,9435,9480,9465,9244″][/vc_column][/vc_row][vc_row][vc_column][vc_column_text]

The Crescent Is Almost Ready

And so we have it – almost. All the major construction is completed. Sainsburys and Cineworld are open with the other units being fitted out for their new occupants.[/vc_column_text][/vc_column][/vc_row][vc_row][vc_column][vc_masonry_media_grid style=”lazy” item=”9524″ grid_id=”vc_gid:1510601948125-823cc895-1db8-10″ include=”9484,9485,9486,9438,9437,9436,9487″][/vc_column][/vc_row][vc_row el_id=”editorial-pictures”][vc_column][vc_column_text]

Editorial Pictures

Follow the link to see a full selection of editorial pictures of The Crescent under construction. Many of these pictures, plus more not shown here, are available for licensing via the lightbox link.

Benefits of Long Term Projects for Photographers

I think this kind of long term project is valuable for photographers for many reasons.

Documenting change over time requires a certain amount of self discipline to revisit the same place over and over again. Your first couple of visits to the scene will be pretty easy as you are ‘setting the scene’ so to speak. These initial visits are basically documenting the scene as it exists prior to any change.

Over time though, especially during multi-year projects where nothing seems to change from month to month, it can become harder to get scenes that have an element of interest (both for you and any potential future viewers). This is particularly true if you pass the site regularly. Seeing the site repeatedly makes it harder to judge the incremental change.

This project started off as a casual project with the main aim to simply record the changes. The timing was not perfect (is it ever?) as I was dealing with some pretty intense personal circumstances. The project was a form of therapy to allow me to simply chill out whilst doing something constructive.

Looking back, I realise how valuable such a project can be to develop a photographers skills, particularly those skills that are not needed to use a camera.

If you decide to try a similar project here are a few pointers I think you will find of use.

I recommend setting up a timetable that splits the project into a timeline. Try to find out as much as possible about the project. Establish the planned start and finish dates as a bare minimum. Also, try to get some inside ‘gen’ on any other key dates. Events such as when large or unusual machines are expected on site, local dignitaries are booked to visit etc will provide many photographic opportunities. Try and find out project phase dates (demolition phase, land clearance phase, construction phase etc).

Armed with this info you can build a rough schedule and slot in appropriate potential dates to visit. Review the schedule and build yourself a shooting plan. Your shooting plan should include both regular visits, to capture the phased changes, and ad-hoc dates that include the projects key dates. Creating a shooting plan is one thing – sticking to it is another. This is where self discipline is vital. How frequent your regular visits are is entirely up to you. For a year long project you might decide fortnightly or monthly visits are appropriate. Remember, the more frequent the visits the harder it is to stick to the plan. Conversely, the less frequent the visits, the more likely you are to miss something of interest. Less frequent visits make it more likely you might forget or lose interest.

Before each visit, review your pictures from previous visits. By doing this you will refresh your mind on areas of interest. You will also see the step change since your last visit – even if very little may seem to have changed to the untrained eye.

Even if little does change, you will find over time that different viewpoints become available. This allows you to capture the work from a different angle which in itself can reveal further scenes of interest.

This is particularly useful when you are trying to include existing landmarks into the changing scene. Existing landmarks are useful because it allows people to orientate themselves within the scene.

All these pictures were taken from outside the perimeter of the building site. Going forward I would like to get the necessary permissions to enter a site. This will allow some real insight into what is involved and allow access to the real essence of the project.

Reviewing this project, I realise I learnt so much that will be invaluable for future projects. More importantly I realise how much I missed.

I hope you have enjoyed this snapshot of history and my thoughts about planning a similar project. I enjoyed tracking the development of this building project. Its surprising how quickly once familiar scenes can completely change.

Please let me know what you think of these tips. It would be great to hear about any similar projects you have undertaken and what you learned.

Feel free to ask me any questions about this article.

Thanks for reading and all the best for now

Gary[/vc_column_text][/vc_column][/vc_row][vc_row][vc_column][vc_separator color=”sky” el_width=”80″][/vc_column][/vc_row][vc_row][vc_column][vc_cta h2=”Subscribe to GDMK Images” txt_align=”center” add_button=”bottom” btn_title=”Sign me up I want to save 10% on my purchase!” btn_custom_background=”#0098da” btn_custom_text=”#fffffd” btn_link=”url:http%3A%2F%2Fstaging.gdmkimages.co.uk%2Fsubscribe-gdmk-images-newsletters%2F|title:Subscribe%20and%20save%2010%25%20off%20your%20next%20wall%20art%2C%20phone%20case%20or%20t-shirt%20purchase!|”]Subscribe and save 10% off your next wall art, phone case or t-shirt purchase![/vc_cta][/vc_column][/vc_row][vc_row][vc_column][vc_column_text]

Share this story about Hinckleys new shopping centre with your friends and colleagues …. thanks!

[juiz_sps buttons=”facebook,twitter, google, pinterest, digg, linkedin, stumbleupon, tumblr, reddit, mail, bookmark”]


[/vc_column_text][/vc_column][/vc_row][vc_row][vc_column][vc_column_text]

Related Posts …..

[/vc_column_text][ess_grid alias=”new-images”][/vc_column][/vc_row]